Showing posts with label oracle restart. Show all posts

Wednesday, May 6, 2026

Out of Place (OOP) Patching of Oracle Restart 26ai

Previous posts showed OOP for 19c and 21c Oracle restart. Things are even simpler with 26ai.
The current patch level is
crsctl query has releasepatch
Oracle Clusterware release patch level is [2107015493] and the complete list of patches [38743669 38743682 38743688 38743695 38743706 ] have been applied on the local node. The release patch string is [23.26.1.0.0].

1. First step is to setup the new GI home. The best way to do this is to use the GI gold image with the latest RU. Oracle documentation mentions unzipping the installer and then patching before switching home. During testing it was found that opatchauto brings down the HAS stack even though existing homes are not affected by the patching. With the use of gold image the down time could be kept to a minimum. In this case the new GI home is
/opt/company/app/oracle/product/23.26.2/grid
The gold image with the latest RU at the time of this posts is p39099896_230000_Linux-x86-64.zip. Unzip the file into above location.
unzip p39099896_230000_Linux-x86-64.zip -d /opt/company/app/oracle/product/23.26.2/grid
2. Register the new GI home location in the oracle inventory.
cd /opt/company/app/oracle/product/23.26.2/grid
./gridSetup.sh -silent -setupHomeAs /opt/company/app/oracle/product/23.26.1/grid
The -setupHomeAs command installs the GI software with Oracle base and privileged operating system groups identical to the existing GI home which is located in /opt/company/app/oracle/product/23.26.1/grid. This step also adds an entry to the inventory.xml.
<HOME NAME="OraGI23Home2" LOC="/opt/company/app/oracle/product/23.26.2/grid" TYPE="O" IDX="8"/>
After registering the GI home could check the patches in it.
./OPatch/opatch lspatches
39099119;MICRONAUT RELEASE UPDATE 23.26.2.0.0 (39099119) Gold Image
39099244;RHP RELEASE UPDATE 23.26.2.0.0 (39099244) Gold Image
39099110;ACFS RELEASE UPDATE 23.26.2.0.0 (39099110) Gold Image
39093738;OCW RELEASE UPDATE 23.26.2.0.0 (39093738) Gold Image
39093711;Database Release Update : 23.26.2.0.0 (39093711) Gold Image
3. Execute the swtiching GI homes with the following command
./gridSetup.sh -silent -switchGridHome
Launching Oracle Grid Infrastructure Setup Wizard...

As a root user, run the following script(s):
        1. /opt/company/app/oracle/product/23.26.2/grid/root.sh

Run /opt/company/app/oracle/product/23.26.2/grid/root.sh on the following nodes:
[ip-172-31-2-172]


4. When the root.sh is run this will bring down the existing HAS stack (downtime will begin) and carry out the pre and post patch config work and bring the HAS stack up on the new GI home.
/opt/company/app/oracle/product/23.26.2/grid/root.sh
Check /opt/company/app/oracle/product/23.26.2/grid/install/root_ip-172-31-2-172.eu-west-1.compute.internal_2026-05-06_11-50-33-113071205.log for the output of root script
5. Once the HAS stack is started check the patch level
crsctl query has releasepatch
Oracle Clusterware release patch level is [1283328329] and the complete list of patches [39093711 39093738 39099110 39099119 39099244 ] have been applied on the local node. The release patch string is [23.26.2.0.0].

This is the end of out-of-place patching of Oracle restart 26ai.

If gold image installation is not preferred then RU could be applied at the time of GI home registering. This would require use of applyRU which is deprecated in 26ai. This method also reduces the downtime caused by patchnig a base installation.
./gridSetup.sh -silent -setupHomeAs /opt/company/app/oracle/product/23.26.1/grid -applyRU /opt/installs/26ai/39088031
[INFO] [INS-32830] Options -applyRU, -applyPSU and -applyRUR are deprecated in this release. For more details, refer to help documentation.

To switch back to the old use home run the following as root on the old GI home
# cd /opt/company/app/oracle/product/23.26.1/grid
# ./crs/install/roothas.sh -unlock -dstcrshome /opt/company/app/oracle/product/23.26.1/grid
Then run switch home command from the old GI home.
$cd /opt/company/app/oracle/product/23.26.1/grid
./gridSetup.sh -silent -switchGridHome
Related Posts
Out of Place (OOP) Patching of Oracle Restart
Out of Place (OOP) Patching of Oracle Restart 21c

Saturday, February 28, 2026

Upgrading Oracle Restart from 19c to 26ai on RHEL 8

This post shows the steps for upgrading the grid infrastructure portion of 19c Oracle Restart to 26ai.
The current patch level on GI is RU 19.29.
$ORACLE_HOME/OPatch/opatch lspatches
38380425;TOMCAT RELEASE UPDATE 19.0.0.0.0 (38380425)
38322923;OCW RELEASE UPDATE 19.29.0.0.0 (38322923)
38311528;ACFS RELEASE UPDATE 19.29.0.0.0 (38311528)
38291812;Database Release Update : 19.29.0.0.251021 (38291812)
36758186;DBWLM RELEASE UPDATE 19.0.0.0.0 (36758186)
The OS is RHEL8
cat /etc/redhat-release
Red Hat Enterprise Linux release 8.8 (Ootpa)

$ uname -r
4.18.0-477.13.1.el8_8.x86_64
The software and release version of the HAS are as below.
$ crsctl query has releaseversion
Oracle High Availability Services release version on the local node is [19.0.0.0.0]

$ crsctl query has softwareversion
Oracle High Availability Services version on the local node is [19.0.0.0.0]
For 26ai Oracle restart two new additional pre-reqs need to be completed. One is to set kernel parameter kernel.panic=1 and install RPM compat-openssl10(x86_64)-1.0.2. With these no other pre-req failures are expected (on this test system SWAP is flagged which could be ignored)
./runcluvfy.sh stage -pre hacfg

Performing following verification checks ...

  Physical Memory ...PASSED
  Available Physical Memory ...PASSED
  Swap Size ...FAILED (PRVF-7573)
  Free Space: ip-172-31-2-172:/usr,ip-172-31-2-172:/var,ip-172-31-2-172:/etc,ip-172-31-2-172:/sbin,ip-172-31-2-172:/tmp ...PASSED
  User Existence: oracle ...
    Users With Same UID: 1001 ...PASSED
  User Existence: oracle ...PASSED
  Group Existence: dba ...PASSED
  Group Membership: dba ...PASSED
  Run Level ...PASSED
  Architecture ...PASSED
  OS Kernel Version ...PASSED
  OS Kernel Parameter: semmsl ...PASSED
  OS Kernel Parameter: semmns ...PASSED
  OS Kernel Parameter: semopm ...PASSED
  OS Kernel Parameter: semmni ...PASSED
  OS Kernel Parameter: shmmax ...PASSED
  OS Kernel Parameter: shmmni ...PASSED
  OS Kernel Parameter: shmall ...PASSED
  OS Kernel Parameter: file-max ...PASSED
  OS Kernel Parameter: ip_local_port_range ...PASSED
  OS Kernel Parameter: rmem_default ...PASSED
  OS Kernel Parameter: rmem_max ...PASSED
  OS Kernel Parameter: wmem_default ...PASSED
  OS Kernel Parameter: wmem_max ...PASSED
  OS Kernel Parameter: aio-max-nr ...PASSED
  OS Kernel Parameter: panic_on_oops ...PASSED
  OS Kernel Parameter: kernel.panic ...PASSED
  Package: binutils-2.30-113.0.2 ...PASSED
  Package: compat-openssl10-1.0.2 (x86_64) ...PASSED
  Package: fontconfig-2.13.1 (x86_64) ...PASSED
  Package: libgcc-8.5.0 (x86_64) ...PASSED
  Package: libstdc++-8.5.0 (x86_64) ...PASSED
  Package: sysstat-11.7.3 ...PASSED
  Package: make-4.2.1 ...PASSED
  Package: glibc-2.28 (x86_64) ...PASSED
  Package: glibc-devel-2.28 (x86_64) ...PASSED
  Package: libaio-0.3.112 (x86_64) ...PASSED
  Package: nfs-utils-2.3.3-51 ...PASSED
  Package: smartmontools-7.1-1 ...PASSED
  Package: net-tools-2.0-0.52 ...PASSED
  Package: policycoreutils-2.9-1 ...PASSED
  Package: policycoreutils-python-utils-2.9-1 ...PASSED
  Users With Same UID: 0 ...PASSED
  Current Group ID ...PASSED
  Root user consistency ...PASSED

Pre-check for Oracle Restart configuration was unsuccessful.


Failures were encountered during execution of CVU verification request "stage -pre hacfg".

Swap Size ...FAILED
ip-172-31-2-172: PRVF-7573 : Sufficient swap size is not available on node
                 "ip-172-31-2-172" [Required = 15.3892GB (1.613672E7KB) ; Found
                 = 0.0 bytes]


CVU operation performed:      stage -pre hacfg
Date:                         Feb 27, 2026, 3:47:28 PM
CVU version:                  23.26.1.0.0 (010926x8664)
CVU home:                     /opt/_____/app/oracle/product/23.26.1/grid
Grid home:                    /opt/______/app/oracle/product/19.28.0/grid
User:                         oracle
Operating system:             Linux4.18.0-477.13.1.el8_8.x86_64
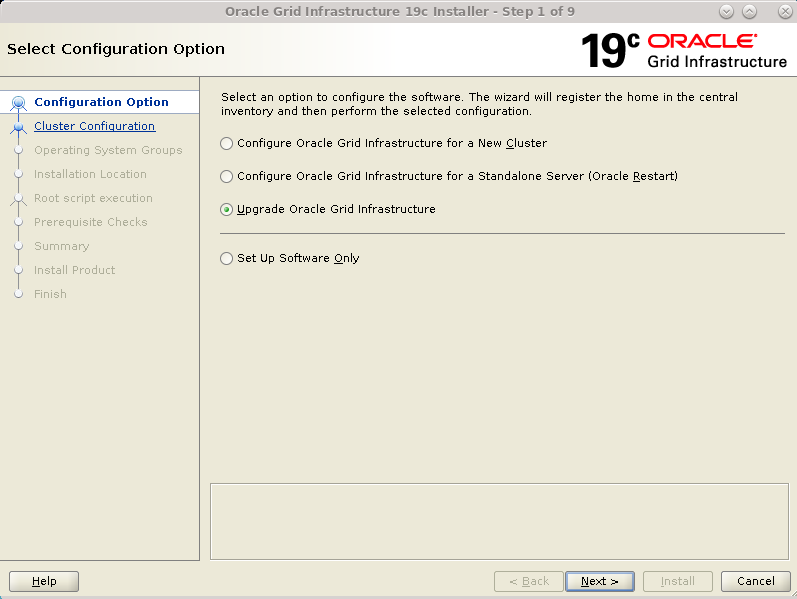
Run the gridSetup.sh and select upgrade option.

Shutdown databases using the ASM that are part of the GI being upgraded.

Register with OMS

Select the Oracle base location

Provide root password or sudo related details. If omitted root script could be run manually in the end.

Check pre-reqs

Verify the summary. At this stage the responses could be saved into a file which could be used for silent upgrade.

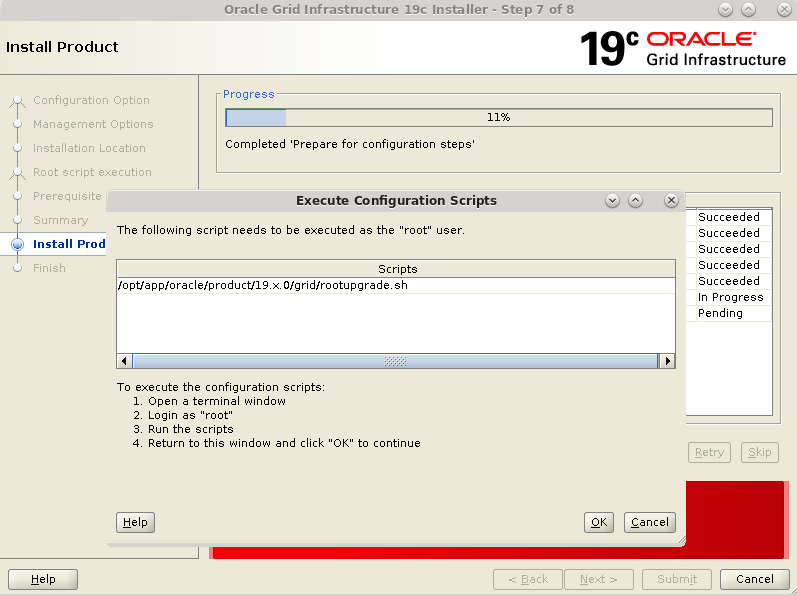
Begin the upgrade and run the rootupgrade.sh when prompted.


./rootupgrade.sh
Performing root user operation.

The following environment variables are set as:
    ORACLE_OWNER= oracle
    ORACLE_HOME=  /opt/company/app/oracle/product/23.26.1/grid

Enter the full pathname of the local bin directory: [/usr/local/bin]:
The contents of "dbhome" have not changed. No need to overwrite.
The file "oraenv" already exists in /usr/local/bin.  Overwrite it? (y/n)
[n]: y
   Copying oraenv to /usr/local/bin ...
The file "coraenv" already exists in /usr/local/bin.  Overwrite it? (y/n)
[n]: y
   Copying coraenv to /usr/local/bin ...

Entries will be added to the /etc/oratab file as needed by
Database Configuration Assistant when a database is created
Finished running generic part of root script.
Now product-specific root actions will be performed.
Executing command '/opt/company/app/oracle/product/23.26.1/grid/perl/bin/perl -I/opt/company/app/oracle/product/23.26/crs/install/roothas.pl  -upgrade'
Using configuration parameter file: /opt/company/app/oracle/product/23.26.1/grid/crs/install/crsconfig_params
The log of current session can be found at:
  /opt/company/app/oracle/crsdata/ip-172-31-2-172/crsconfig/roothas_2026-02-27_04-01-24PM.log
2026/02/27 16:01:25 CLSRSC-595: Executing upgrade step 1 of 11: 'UpgPrechecks'.
acfsutil info fs: ACFS-03036: no mounted ACFS file systems
2026/02/27 16:01:29 CLSRSC-595: Executing upgrade step 2 of 11: 'GetOldConfig'.
2026/02/27 16:01:32 CLSRSC-595: Executing upgrade step 3 of 11: 'GenSiteGUIDs'.
2026/02/27 16:01:32 CLSRSC-595: Executing upgrade step 4 of 11: 'SetupOSD'.
2026/02/27 16:01:32 CLSRSC-595: Executing upgrade step 5 of 11: 'PreUpgrade'.
2026/02/27 16:07:34 CLSRSC-595: Executing upgrade step 6 of 11: 'UpgradeOLR'.
clscfg: EXISTING configuration version 0 detected.
Creating OCR keys for user 'oracle', privgrp 'oinstall'..
Operation successful.
2026/02/27 16:07:42 CLSRSC-595: Executing upgrade step 7 of 11: 'UpgradeOCR'.
LOCAL ONLY MODE
Successfully accumulated necessary OCR keys.
Creating OCR keys for user 'root', privgrp 'root'..
Operation successful.
CRS-4664: Node ip-172-31-2-172 successfully pinned.
2026/02/27 16:07:48 CLSRSC-595: Executing upgrade step 8 of 11: 'CreateOHASD'.
2026/02/27 16:07:49 CLSRSC-595: Executing upgrade step 9 of 11: 'ConfigOHASD'.
2026/02/27 16:08:30 CLSRSC-329: Replacing Clusterware entries in file 'oracle-ohasd.service'
2026/02/27 16:08:39 CLSRSC-595: Executing upgrade step 10 of 11: 'UpgradeSIHA'.


ip-172-31-2-172     2026/02/27 16:09:39     /opt/company/app/oracle/crsdata/ip-172-31-2-172/olr/backup_20260227_160939.olr     2107015493

ip-172-31-2-172     2022/02/08 17:07:46     /opt/company/app/oracle/crsdata/ip-172-31-2-172/olr/backup_20220208_170746.olr     3342960164
2026/02/27 16:09:39 CLSRSC-595: Executing upgrade step 11 of 11: 'InstallACFS'.

2026/02/27 16:11:26 CLSRSC-327: Successfully configured Oracle Restart for a standalone server
This concludes the successful upgrade of Oracle restart GI to 26ai.

cluvfy stage -post hacfg

Performing following verification checks ...

  Oracle Restart Integrity ...PASSED
  OLR Integrity ...PASSED

Post-check for Oracle Restart configuration was successful.

CVU operation performed:      stage -post hacfg
Date:                         Feb 24, 2026, 3:35:01 PM
CVU version:                  23.26.1.0.0 (010926x8664)
CVU home:                     /opt/company/app/oracle/product/23.26.1/grid
Grid home:                    /opt/company/app/oracle/product/23.26.1/grid
User:                         oracle
Operating system:             Linux4.18.0-553.84.1.el8_10.x86_64

$ crsctl query has releaseversion
Oracle High Availability Services release version on the local node is [23.0.0.0.0]

$ crsctl query has softwareversion
Oracle High Availability Services version on the local node is [23.0.0.0.0]
The ASM diskgroup related attributes could also upgraded at this stage. Current attributes values are
select * from v$asm_attribute where name like '%compat%'

NAME                           VALUE                          GROUP_NUMBER ATTRIBUTE_INDEX ATTRIBUTE_INCARNATION READ_ON SYSTEM_     CON_ID
------------------------------ ------------------------------ ------------ --------------- --------------------- ------- ------- ----------
compatible.asm                 19.0.0.0.0                                1             110                     1 N       Y                0
compatible.rdbms               19.0.0.0.0                                1             112                     1 N       Y                0
compatible.advm                19.0.0.0.0                                1             113                     1 N       Y                0
compatible.asm                 19.0.0.0.0                                2             110                     1 N       Y                0
compatible.rdbms               19.0.0.0.0                                2             112                     1 N       Y                0
compatible.advm                19.0.0.0.0                                2             113                     1 N       Y                0
DO NOT upgrade the compatible.rdbms unless database compatibility parameter is upgraded first.
Both compatible.asm and compatible.advm are upgraded for each diskgroup using asmca
$ asmca -silent -editDiskGroupAttributes -diskGroupName data -attribute compatible.asm=23.0.0.0.0

[DBT-30025] UPDATE_DG_ATTRIBUTES_SUCCESS

$ asmca -silent -editDiskGroupAttributes -diskGroupName fra -attribute compatible.asm=23.0.0.0.0

[DBT-30025] UPDATE_DG_ATTRIBUTES_SUCCESS

$ asmca -silent -editDiskGroupAttributes -diskGroupName data -attribute compatible.advm=23.0.0.0.0

[DBT-30025] UPDATE_DG_ATTRIBUTES_SUCCESS

$ asmca -silent -editDiskGroupAttributes -diskGroupName fra -attribute compatible.advm=23.0.0.0.0

[DBT-30025] UPDATE_DG_ATTRIBUTES_SUCCESS
ASM alert log could be viewed for update messages
2026-02-27T16:18:19.683968+00:00
SQL> alter diskgroup data set attribute 'compatible.asm' = '23.0.0.0.0' /* ASMCA */
2026-02-27T16:18:19.709087+00:00
NOTE: Advancing ASM compatibility from 19.0.0.0.0 to 23.0.0.0.0 for grp 1
2026-02-27T16:18:19.739061+00:00
NOTE: Advancing compatible.asm (replicated) on grp 1 disk DATA_0000
NOTE: Advancing compatible.asm (replicated) on grp 1 disk DATA_0001
NOTE: Advancing compatible.asm on grp 1 disk DATA_0000
NOTE: Advancing compatible.asm on grp 1 disk DATA_0001
2026-02-27T16:18:19.741622+00:00
NOTE: set version 3 for asmCompat 23.0.0.0.0 for group 1
2026-02-27T16:18:19.745668+00:00
SUCCESS: Advanced compatible.asm to 23.0.0.0.0 for grp 1
2026-02-27T16:18:19.746091+00:00
NOTE: Instance updated compatible.asm to 23.0.0.0.0 for grp 1 (DATA).
2026-02-27T16:18:19.829708+00:00
NOTE: Advancing AVD compatibility to 23.0.0.0.0 for grp 1
2026-02-27T16:18:19.829918+00:00
SUCCESS: Advanced compatible.advm to 23.0.0.0.0 for grp 1
2026-02-27T16:18:19.842912+00:00
SUCCESS: alter diskgroup data set attribute 'compatible.asm' = '23.0.0.0.0' /* ASMCA */
After this upgrade additional compatibile attributes gets enabled on the disk group. At this time of this post ASM Admin guide did not have any mention of these attributes.
select * from v$asm_attribute where name like '%compat%'

NAME                                     VALUE           GROUP_NUMBER ATTRIBUTE_INDEX ATTRIBUTE_INCARNATION READ_ON SYSTEM_     CON_ID
---------------------------------------- --------------- ------------ --------------- --------------------- ------- ------- ----------
compatible.advm                          23.0.0.0.0                 1             103                     1 N       Y                0
compatible.asm                           23.0.0.0.0                 1             100                     1 N       Y                0
compatible.patch.asm.blkpatchredo        ENABLED                    1             248                     1 Y       Y                0
compatible.patch.asm.containerparity     ENABLED                    1             248                     1 Y       Y                0
compatible.patch.asm.crc32cksum          ENABLED                    1             248                     1 Y       Y                0
compatible.patch.asm.doubleparity        ENABLED                    1             248                     1 Y       Y                0
compatible.rdbms                         19.0.0.0.0                 1             102                     1 N       Y                0
compatible.advm                          23.0.0.0.0                 2             103                     1 N       Y                0
compatible.asm                           23.0.0.0.0                 2             100                     1 N       Y                0
compatible.patch.asm.blkpatchredo        ENABLED                    2             248                     1 Y       Y                0
compatible.patch.asm.containerparity     ENABLED                    2             248                     1 Y       Y                0
compatible.patch.asm.crc32cksum          ENABLED                    2             248                     1 Y       Y                0
compatible.patch.asm.doubleparity        ENABLED                    2             248                     1 Y       Y                0
compatible.rdbms                         19.0.0.0.0                 2             102                     1 N       Y                0
This conclude the upgrade of Oracle restart from 19c to 26ai.

Related Posts
Upgrading Oracle Restart from 19c to 21c on RHEL 7
Upgrading Oracle Single Instance with ASM (Oracle Restart) from 11.2.0.4 to 19c (19.6) on RHEL 7
Upgrading Oracle Restart from 18c (18.6) to 19c (19.3)
Upgrading Oracle Restart from 12.2.0.1 to 18c
Upgrading Oracle Single Instance with ASM (Oracle Restart) from 11.2.0.4 to 12.2.0.1
Upgrading Oracle Single Instance with ASM (Oracle Restart) from 12.1.0.2 to 12.2.0.1
Upgrading Single Instance on ASM from 11.2.0.3 to 11.2.0.4
Upgrading Grid Infrastructure Used for Single Instance from 11.2.0.4 to 12.1.0.2

The same thing could be done in silent mode using a response file. Invoke the gridSetup.sh with upgrade and response file optoins. When prompted run the root upgrade script. The output is written to log file.
./gridSetup.sh -upgrade -silent -responseFile /opt/installs/26ai/grids.rsp
Launching Oracle Grid Infrastructure Setup Wizard...

*********************************************
Swap Size: This is a prerequisite condition to test whether sufficient total swap space is available on the system.
Severity: IGNORABLE
Overall status: VERIFICATION_FAILED
Error message: PRVF-7573 : Sufficient swap size is not available on node "ip-172-31-8-174" [Required = 16GB (1.677721
Cause:  The swap size found does not meet the minimum requirement.
Action:  Increase swap size to at least meet the minimum swap space requirement.
-----------------------------------------------
[WARNING] [INS-13014] Target environment does not meet some optional requirements.
   CAUSE: Some of the optional prerequisites are not met. See logs for details. /opt/company/app/oraInventory/logs/Gr
   ACTION: Identify the list of failed prerequisite checks from the log: /opt/company/app/oraInventory/logs/GridSetupon manual find the appropriate configuration to meet the prerequisites and fix it manually.
The response file for this session can be found at:
 /opt/company/app/oracle/product/23.26.1/grid/install/response/grid_2026-02-24_03-26-13PM.rsp

You can find the log of this install session at:
 /opt/company/app/oraInventory/logs/GridSetupActions2026-02-24_03-26-13PM/gridSetupActions2026-02-24_03-26-13PM.log

As a root user, run the following script(s):
        1. /opt/company/app/oracle/product/23.26.1/grid/rootupgrade.sh

Run /opt/company/app/oracle/product/23.26.1/grid/rootupgrade.sh on the following nodes:
[ip-172-31-8-174]

Friday, July 21, 2023

Out of Place (OOP) Patching of Oracle Restart 21c

Previous post showed OOP for 19c Oracle restart. Things are much simpler in 21c and can expect the same for 23c once released. The -switchGridHome option is supported for Oracle Restart in 21c (Oracle doc here). As such the OOP is simply installing new GI home in a different location with -switchGridHome option.
The current GI home is in /opt/company/app/oracle/product/21.x.0/grid and release patch is
crsctl query has releasepatch
Oracle Clusterware release patch level is [3414221900] and the complete list of patches [35132583 35134934 35134943 35149778 35222143 35226235 ] have been applied on the local node. The release patch string is [21.10.0.0.0].


Run the gridsetup with -switchGridHome option and any RU and one-off patches. This step doesn't result in downtime.
./gridSetup.sh -silent -switchGridHome  -applyRU /opt/installs/patches/35427907
Preparing the home to patch...
Applying the patch /opt/installs/patches/35427907...
Successfully applied the patch.
The log can be found at: /opt/company/app/oraInventory/logs/GridSetupActions2023-07-21_01-55-36PM/installerPatchActions_2023-07-21_01-55-36PM.log
Launching Oracle Grid Infrastructure Setup Wizard...

You can find the log of this install session at:
 /opt/company/app/oraInventory/logs/GridSetupActions2023-07-21_01-55-36PM/gridSetupActions2023-07-21_01-55-36PM.log

As a root user, execute the following script(s):
        1. /opt/company/app/oracle/product/21.11.0/grid/root.sh

Execute /opt/company/app/oracle/product/21.11.0/grid/root.sh on the following nodes:
[ip-172-31-10-193]
When prompted run the root.sh. This is where the grid home switching happens and results in down time. In the course of running root.sh the HAS stack is brought down in the old GI home and started in the new GI home.
/opt/company/app/oracle/product/21.11.0/grid/root.sh
Check /opt/company/app/oracle/product/21.11.0/grid/install/root_ip-172-31-10-193.eu-west-1.compute.internal_2023-07-21_14-06-15-742998108.log for the output of root script
The output on the log files shows prepatch and postpatch steps run on the new GI home.
Performing root user operation.

The following environment variables are set as:
    ORACLE_OWNER= oracle
    ORACLE_HOME=  /opt/company/app/oracle/product/21.11.0/grid
   Copying dbhome to /usr/local/bin ...
   Copying oraenv to /usr/local/bin ...
   Copying coraenv to /usr/local/bin ...

Entries will be added to the /etc/oratab file as needed by
Database Configuration Assistant when a database is created
Finished running generic part of root script.
Now product-specific root actions will be performed.
Using configuration parameter file: /opt/company/app/oracle/product/21.11.0/grid/crs/install/crsconfig_params
The log of current session can be found at:
  /opt/company/app/oracle/crsdata/ip-172-31-10-193/crsconfig/hapatch_2023-07-21_02-06-16PM.log
2023/07/21 14:06:18 CLSRSC-347: Successfully unlock /opt/company/app/oracle/product/21.11.0/grid
2023/07/21 14:06:18 CLSRSC-671: Pre-patch steps for patching GI home successfully completed.
Using configuration parameter file: /opt/company/app/oracle/product/21.11.0/grid/crs/install/crsconfig_params
The log of current session can be found at:
  /opt/company/app/oracle/crsdata/ip-172-31-10-193/crsconfig/hapatch_2023-07-21_02-06-18PM.log
2023/07/21 14:07:16 CLSRSC-329: Replacing Clusterware entries in file 'oracle-ohasd.service'
2023/07/21 14:08:01 CLSRSC-672: Post-patch steps for patching GI home successfully completed.


Looking at the currently running processes will show the GI related processes running out of new GI home.
  32070 ?        Ssl    0:02 /opt/company/app/oracle/product/21.11.0/grid/bin/ohasd.bin reboot _ORA_BLOCKING_STACK_LOCALE=AMERICAN_AMERICA.AL32UTF8
  32281 ?        Ssl    0:00 /opt/company/app/oracle/product/21.11.0/grid/bin/oraagent.bin
  32308 ?        Ssl    0:00 /opt/company/app/oracle/product/21.11.0/grid/bin/evmd.bin
  32312 ?        Ss     0:00 /opt/company/app/oracle/product/21.11.0/grid/bin/tnslsnr LISTENER -no_crs_notify -inherit
  32368 ?        Ssl    0:00 /opt/company/app/oracle/product/21.11.0/grid/bin/evmlogger.bin -o /opt/company/app/oracle/product/21.11.0/grid/log/[HOSTNAME]/evmd/evmlogger.info -l /opt/company/app/oracle/product/21.11.0/grid/log/[HOSTNAME]
  32384 ?        Ssl    0:00 /opt/company/app/oracle/product/21.11.0/grid/bin/cssdagent
  32423 ?        Ssl    0:00 /opt/company/app/oracle/product/21.11.0/grid/bin/onmd.bin
  32425 ?        Ssl    0:00 /opt/company/app/oracle/product/21.11.0/grid/bin/ocssd.bin
Release patch is 21.11
 crsctl query has releasepatch
Oracle Clusterware release patch level is [1435465441] and the complete list of patches [35428978 35442014 35442022 35442029 35550598 35589155 ] have been applied on the local node. The release patch string is [21.11.0.0.0].

Unlike in 19c no manual work is needed for updating the oracle inventory. New GI home is auto added with crs=true and crs=true is removed from old home during the GI home switch processes.
<HOME NAME="OraGI21Home1" LOC="/opt/company/app/oracle/product/21.x.0/grid" TYPE="O" IDX="1"/>
<HOME NAME="OraGI21Home2" LOC="/opt/company/app/oracle/product/21.11.0/grid" TYPE="O" IDX="4" CRS="true"/>

Related Posts
Out of Place (OOP) Patching of Oracle Restart

Thursday, May 11, 2023

Out of Place (OOP) Patching of Oracle Restart

Oracle grid infrastructure deployed in a RAC configuration has the option switchGridHome for out of place patching. But this option doesn't work with Oracle restart.
./gridSetup.sh -silent -switchGridHome -applyRU /opt/app/oracle/installs/19.19/35037840
Preparing the home to patch...
Preparing the home to apply the patch failed. For details look at the logs from /opt/app/oraInventory/logs.
The log can be found at: /opt/app/oraInventory/logs/GridSetupActions2023-05-11_10-17-15AM/installerPatchActions_2023-05-11_10-17-15AM.log
Launching Oracle Grid Infrastructure Setup Wizard...

[FATAL] [INS-45101] Clusterware is not running on the local node.
   ACTION: Ensure that the Clusterware is configured and is running on local node before proceeding.
MOS Doc 2764906.1 states that switchGridHome option is not supported for Oracle Restart.
However, there is a way to do OOP on Oracle Restart explained here.
This post is based on OOP of a Oracle restart using the steps mentioned in the link above. The current configuration consists of following resources
Resource Name             Type                      Target             State              Host
-------------             ------                    -------            --------           ----------
ora.DATA.dg               ora.diskgroup.type        ONLINE             ONLINE             ip-172-31-2-77
ora.FRA.dg                ora.diskgroup.type        ONLINE             ONLINE             ip-172-31-2-77
ora.LISTENER.lsnr         ora.listener.type         ONLINE             ONLINE             ip-172-31-2-77
ora.asm                   ora.asm.type              ONLINE             ONLINE             ip-172-31-2-77
ora.cssd                  ora.cssd.type             ONLINE             ONLINE             ip-172-31-2-77
ora.diskmon               ora.diskmon.type          OFFLINE            OFFLINE
ora.evmd                  ora.evm.type              ONLINE             ONLINE             ip-172-31-2-77
ora.ons                   ora.ons.type              ONLINE             ONLINE             ip-172-31-2-77
ora.testcdb.db            ora.database.type         ONLINE             ONLINE             ip-172-31-2-77
ora.testcdb.dbxrw.svc     ora.service.type          ONLINE             ONLINE             ip-172-31-2-77
ora.testcdb.testsrv.svc   ora.service.type          ONLINE             ONLINE             ip-172-31-2-77
The current GI Home is /opt/app/oracle/product/19.x.0/grid
The new GI home will be /opt/app/oracle/product/19.19.0/grid
1. First step is to install new GI home with the required patches using the software only option. How to do a software only Oracle restart installation was shown in a previous post. In this instance a response file is used and 19.19 RU is applied at install time.
$ ./gridSetup.sh -silent -responseFile /opt/app/oracle/installs/19.19/grid_sw_only.rsp -applyRU /opt/app/oracle/installs/19.19/35037840
Preparing the home to patch...
Applying the patch /opt/app/oracle/installs/19.19/35037840...
Successfully applied the patch.
The log can be found at: /opt/app/oraInventory/logs/GridSetupActions2023-05-11_11-37-14AM/installerPatchActions_2023-05-11_11-37-14AM.log
Launching Oracle Grid Infrastructure Setup Wizard...

[WARNING] [INS-32022] Grid infrastructure software for a cluster installation must not be under an Oracle base directory.
   CAUSE: Grid infrastructure for a cluster installation assigns root ownership to all parent directories of the Grid home location. As a result, ownership of all named directories in the software location path is changed to root, creating permissions errors for all subsequent installations into the same Oracle base.
   ACTION: Specify software location outside of an Oracle base directory for grid infrastructure for a cluster installation.
[WARNING] [INS-13014] Target environment does not meet some optional requirements.
   CAUSE: Some of the optional prerequisites are not met. See logs for details. /opt/app/oraInventory/logs/GridSetupActions2023-05-11_11-37-14AM/gridSetupActions2023-05-11_11-37-14AM.log
   ACTION: Identify the list of failed prerequisite checks from the log: /opt/app/oraInventory/logs/GridSetupActions2023-05-11_11-37-14AM/gridSetupActions2023-05-11_11-37-14AM.log. Then either from the log file or from installation manual find the appropriate configuration to meet the prerequisites and fix it manually.
The response file for this session can be found at:
 /opt/app/oracle/product/19.19.0/grid/install/response/grid_2023-05-11_11-37-14AM.rsp

You can find the log of this install session at:
 /opt/app/oraInventory/logs/GridSetupActions2023-05-11_11-37-14AM/gridSetupActions2023-05-11_11-37-14AM.log

As a root user, execute the following script(s):
        1. /opt/app/oracle/product/19.19.0/grid/root.sh

Execute /opt/app/oracle/product/19.19.0/grid/root.sh on the following nodes:
[ip-172-31-2-77]

Successfully Setup Software with warning(s).
Run the root.sh
/opt/app/oracle/product/19.19.0/grid/root.sh
Check /opt/app/oracle/product/19.19.0/grid/install/root_ip-172-31-2-77.eu-west-1.compute.internal_2023-05-11_11-52-11-416203678.log for the output of root script

# more /opt/app/oracle/product/19.19.0/grid/install/root_ip-172-31-12-6.eu-west-1.compute.internal_2023-05-11_11-52-11-416203678.log
Performing root user operation.

The following environment variables are set as:
    ORACLE_OWNER= oracle
    ORACLE_HOME=  /opt/app/oracle/product/19.19.0/grid
   Copying dbhome to /usr/local/bin ...
   Copying oraenv to /usr/local/bin ...
   Copying coraenv to /usr/local/bin ...

Entries will be added to the /etc/oratab file as needed by
Database Configuration Assistant when a database is created
Finished running generic part of root script.
Now product-specific root actions will be performed.

To configure Grid Infrastructure for a Cluster or Grid Infrastructure for a Stand-Alone Server execute the following command as oracle user:
/opt/app/oracle/product/19.19.0/grid/gridSetup.sh
This command launches the Grid Infrastructure Setup Wizard. The wizard also supports silent operation, and the parameters can be passed through the response file that is available in the installation media.
2. Verify the new GI home has the patches applied.
export ORACLE_HOME=/opt/app/oracle/product/19.19.0/grid
$ORACLE_HOME/OPatch/opatch lspatches
35107512;TOMCAT RELEASE UPDATE 19.0.0.0.0 (35107512)
35050331;OCW RELEASE UPDATE 19.19.0.0.0 (35050331)
35050325;ACFS RELEASE UPDATE 19.19.0.0.0 (35050325)
35042068;Database Release Update : 19.19.0.0.230418 (35042068)
33575402;DBWLM RELEASE UPDATE 19.0.0.0.0 (33575402)

OPatch succeeded.


3. As root run the prepatch steps on the new GI home. This does not bring any of the running services down.
# /opt/app/oracle/product/19.19.0/grid/crs/install/roothas.sh -prepatch -dstcrshome /opt/app/oracle/product/19.19.0/grid
Using configuration parameter file: /opt/app/oracle/product/19.19.0/grid/crs/install/crsconfig_params
The log of current session can be found at:
  /opt/app/oracle/crsdata/ip-172-31-2-77/crsconfig/hapatch_2023-05-11_11-48-38AM.log
2023/05/11 11:48:59 CLSRSC-347: Successfully unlock /opt/app/oracle/product/19.19.0/grid
2023/05/11 11:48:59 CLSRSC-671: Pre-patch steps for patching GI home successfully completed.
4. As root run the postpatch step on the new GI home. This step results in currently running services being brought down and started using the new GI home.
# /opt/app/oracle/product/19.19.0/grid/crs/install/roothas.sh -postpatch -dstcrshome /opt/app/oracle/product/19.19.0/grid
Using configuration parameter file: /opt/app/oracle/product/19.19.0/grid/crs/install/crsconfig_params
The log of current session can be found at:
  /opt/app/oracle/crsdata/ip-172-31-2-77/crsconfig/hapatch_2023-05-11_11-49-46AM.log
Redirecting to /bin/systemctl restart rsyslog.service
2023/05/11 11:50:15 CLSRSC-329: Replacing Clusterware entries in file 'oracle-ohasd.service'
2023/05/11 11:51:37 CLSRSC-672: Post-patch steps for patching GI home successfully completed.
On linux looking at the currently running processes will show the GI related processes running out of new GI home.
 9397 ?        Ssl    0:06 /opt/app/oracle/product/19.19.0/grid/bin/ohasd.bin reboot
 9685 ?        Ssl    0:06 /opt/app/oracle/product/19.19.0/grid/bin/oraagent.bin
 9713 ?        Ssl    0:02 /opt/app/oracle/product/19.19.0/grid/bin/evmd.bin
 9716 ?        Ssl    0:00 /opt/app/oracle/product/19.19.0/grid/bin/tnslsnr LISTENER -no_crs_notify -inherit
 9733 ?        Ss     0:00 /opt/app/oracle/product/19.19.0/grid/opmn/bin/ons -d
 9789 ?        Ssl    0:02 /opt/app/oracle/product/19.19.0/grid/bin/evmlogger.bin -o /opt/app/oracle/product/19.19.0/grid/log/[HOSTNAME]/evmd/evmlogger.info -l /opt/app/oracle/product/19.19.0/grid/log/[HOSTNAME]/evmd/evmlogger.log
 9805 ?        Ssl    0:02 /opt/app/oracle/product/19.19.0/grid/bin/cssdagent
 9845 ?        Ssl    0:02 /opt/app/oracle/product/19.19.0/grid/bin/ocssd.bin
 9929 ?        Sl     0:00 /opt/app/oracle/product/19.19.0/grid/opmn/bin/ons -d
Resources will be online as before
Resource Name             Type                      Target             State              Host
-------------             ------                    -------            --------           ----------
ora.DATA.dg               ora.diskgroup.type        ONLINE             ONLINE             ip-172-31-2-77
ora.FRA.dg                ora.diskgroup.type        ONLINE             ONLINE             ip-172-31-2-77
ora.LISTENER.lsnr         ora.listener.type         ONLINE             ONLINE             ip-172-31-2-77
ora.asm                   ora.asm.type              ONLINE             ONLINE             ip-172-31-2-77
ora.cssd                  ora.cssd.type             ONLINE             ONLINE             ip-172-31-2-77
ora.diskmon               ora.diskmon.type          OFFLINE            OFFLINE
ora.evmd                  ora.evm.type              ONLINE             ONLINE             ip-172-31-2-77
ora.ons                   ora.ons.type              ONLINE             ONLINE             ip-172-31-2-77
ora.testcdb.db            ora.database.type         ONLINE             ONLINE             ip-172-31-2-77
ora.testcdb.dbxrw.svc     ora.service.type          ONLINE             ONLINE             ip-172-31-2-77
ora.testcdb.testsrv.svc   ora.service.type          ONLINE             ONLINE             ip-172-31-2-77
5. Update the inventory by setting CRS=True for new GI home and False for old GI home.
$ /opt/app/oracle/product/19.19.0/grid/oui/bin/runInstaller -updateNodeList ORACLE_HOME=/opt/app/oracle/product/19.19.0/grid CRS=TRUE
Starting Oracle Universal Installer...

Checking swap space: must be greater than 500 MB.   Actual 599 MB    Passed
The inventory pointer is located at /etc/oraInst.loc

$ /opt/app/oracle/product/19.x.0/grid/oui/bin/runInstaller -updateNodeList ORACLE_HOME=/opt/app/oracle/product/19.x.0/grid CRS=FALSE
Starting Oracle Universal Installer...

Checking swap space: must be greater than 500 MB.   Actual 599 MB    Passed
The inventory pointer is located at /etc/oraInst.loc
If happy with the results then the old GI home could be deinstalled.


If for whatever reason need to rollback to old GI home after successfully moving to new GI home, then use the same pre and post patch steps using the old GI home.
# /opt/app/oracle/product/19.x.0/grid/crs/install/roothas.sh -prepatch -dstcrshome /opt/app/oracle/product/19.x.0/grid
Using configuration parameter file: /opt/app/oracle/product/19.x.0/grid/crs/install/crsconfig_params
The log of current session can be found at:
  /opt/app/oracle/crsdata/ip-172-31-2-77/crsconfig/hapatch_2023-05-11_10-45-53AM.log
Using configuration parameter file: /opt/app/oracle/product/19.x.0/grid/crs/install/crsconfig_params
The log of current session can be found at:
  /opt/app/oracle/crsdata/ip-172-31-2-77/crsconfig/hapatch_2023-05-11_10-45-54AM.log
2023/05/11 10:45:55 CLSRSC-347: Successfully unlock /opt/app/oracle/product/19.x.0/grid
2023/05/11 10:45:55 CLSRSC-671: Pre-patch steps for patching GI home successfully completed.

# /opt/app/oracle/product/19.x.0/grid/crs/install/roothas.sh -postpatch -dstcrshome /opt/app/oracle/product/19.x.0/grid
Using configuration parameter file: /opt/app/oracle/product/19.x.0/grid/crs/install/crsconfig_params
The log of current session can be found at:
  /opt/app/oracle/crsdata/ip-172-31-2-77/crsconfig/hapatch_2023-05-11_10-46-08AM.log
2023/05/11 10:46:21 CLSRSC-329: Replacing Clusterware entries in file 'oracle-ohasd.service'
2023/05/11 10:47:47 CLSRSC-672: Post-patch steps for patching GI home successfully completed.


The listener config shows new GI home.
srvctl config listener
Name: LISTENER
Type: Database Listener
Home: /opt/app/oracle/product/19.19.0/grid
End points: TCP:1521
Listener is enabled.
However, if the ASM SPfile is on a FS instead of on ASM them this location is not updated. File must be moved manually and spfile location need to be updated afterwards.
srvctl config asm
ASM home: <CRS home>
Password file:
Backup of Password file:
ASM listener: LISTENER
Spfile: /opt/app/oracle/product/19.x.0/grid/dbs/spfile+ASM.ora
ASM diskgroup discovery string: /dev/oracleasm/*

Related Posts
Out of Place (OOP) Patching of Oracle Restart 21c

Wednesday, February 23, 2022

Oracle Restart Install Failures on RHEL8

19.6 or 19.7 DB software could be installed in either RHEL8 or OEL8. There is a dedicated MOS doc on this (2668780.1). However, there's no such document exists for Oracle Restart. Following GI and DB installation guide for 19c would be helpful in getting Oracle restart installed. Latest edition of those install guides list RHEL8/OL8 as valid operating systems.
One of the packages listed on the MOS doc is libnsl12-devel. To install this via dnf enable codeready-builder-for-rhel-8-rhui-rpms in redhat-rhui.repo (when installing on RHEL8 on AWS). To get installer going the distribution is assumed to be OL7. This can result in a false pre-req failure.
export CV_ASSUME_DISTID=OL7
/opt/app/oracle/product/19.x.0/grid/runcluvfy.sh stage -pre hacfg

Verifying Physical Memory ...PASSED
Verifying Available Physical Memory ...PASSED
Verifying Swap Size ...FAILED (PRVF-7573)
Verifying Free Space: ip-172-31-2-172:/usr,ip-172-31-2-172:/var,ip-172-31-2-172:/etc,ip-172-31-2-172:/sbin,ip-172-31-2-172:/tmp ...PASSED
Verifying User Existence: oracle ...
  Verifying Users With Same UID: 1001 ...PASSED
Verifying User Existence: oracle ...PASSED
Verifying Group Existence: dba ...PASSED
Verifying Group Existence: oinstall ...PASSED
Verifying Group Membership: oinstall(Primary) ...PASSED
Verifying Group Membership: dba ...PASSED
Verifying Run Level ...PASSED
Verifying Architecture ...PASSED
Verifying OS Kernel Version ...PASSED
Verifying OS Kernel Parameter: semmsl ...PASSED
Verifying OS Kernel Parameter: semmns ...PASSED
Verifying OS Kernel Parameter: semopm ...PASSED
Verifying OS Kernel Parameter: semmni ...PASSED
Verifying OS Kernel Parameter: shmmax ...PASSED
Verifying OS Kernel Parameter: shmmni ...PASSED
Verifying OS Kernel Parameter: shmall ...PASSED
Verifying OS Kernel Parameter: file-max ...PASSED
Verifying OS Kernel Parameter: ip_local_port_range ...PASSED
Verifying OS Kernel Parameter: rmem_default ...PASSED
Verifying OS Kernel Parameter: rmem_max ...PASSED
Verifying OS Kernel Parameter: wmem_default ...PASSED
Verifying OS Kernel Parameter: wmem_max ...PASSED
Verifying OS Kernel Parameter: aio-max-nr ...PASSED
Verifying OS Kernel Parameter: panic_on_oops ...PASSED
Verifying Package: kmod-20-21 (x86_64) ...PASSED
Verifying Package: kmod-libs-20-21 (x86_64) ...PASSED
Verifying Package: binutils-2.23.52.0.1 ...PASSED
Verifying Package: compat-libcap1-1.10 ...FAILED (PRVF-7532)
Verifying Package: libgcc-4.8.2 (x86_64) ...PASSED
Verifying Package: libstdc++-4.8.2 (x86_64) ...PASSED
Verifying Package: libstdc++-devel-4.8.2 (x86_64) ...PASSED
Verifying Package: sysstat-10.1.5 ...PASSED
Verifying Package: ksh ...PASSED
Verifying Package: make-3.82 ...PASSED
Verifying Package: glibc-2.17 (x86_64) ...PASSED
Verifying Package: glibc-devel-2.17 (x86_64) ...PASSED
Verifying Package: libaio-0.3.109 (x86_64) ...PASSED
Verifying Package: libaio-devel-0.3.109 (x86_64) ...PASSED
Verifying Package: nfs-utils-1.2.3-15 ...PASSED
Verifying Package: smartmontools-6.2-4 ...PASSED
Verifying Package: net-tools-2.0-0.17 ...PASSED
Verifying Users With Same UID: 0 ...PASSED
Verifying Current Group ID ...PASSED
Verifying Root user consistency ...PASSED

Pre-check for Oracle Restart configuration was unsuccessful.


Failures were encountered during execution of CVU verification request "stage -pre hacfg".

Verifying Swap Size ...FAILED
ip-172-31-2-172: PRVF-7573 : Sufficient swap size is not available on node
                 "ip-172-31-2-172" [Required = 15.459GB (1.6209956E7KB) ; Found
                 = 1.25GB (1310716.0KB)]

Verifying Package: compat-libcap1-1.10 ...FAILED
ip-172-31-2-172: PRVF-7532 : Package "compat-libcap1" is missing on node
                 "ip-172-31-2-172"
This failure on package compat-libcap1 is safe to ignore. Refer 2801988.1 for more.


Another failure happens when root.sh is run. Following line could be seen on the log
Failure in execution (rc=-1, 0, No such file or directory)
To fix this install policycoreutils-python-utils package. This is not listed as one of the required rpms nor check when cluvfy is run. Refer 2825802.1 for more.
Beside these failures there's no other additonal steps to look out for. Oracle restart steup can continue same as RHEL7/OL7.

Related Posts
Installing Oracle Restart Without ASM
Oracle Extended Cluster Setup on 19c
Installing 19c (19.3) RAC on RHEL 7 Using Response File
Installing 18c (18.3) RAC on RHEL 7 with Role Separation - Clusterware
Installing 12cR2 (12.2.0.1) RAC on RHEL 6 with Role Separation - Clusterware
Installing 12c (12.1.0.2) Flex Cluster on RHEL 6 with Role Separation
Installing 12c (12.1.0.1) RAC on RHEL 6 with Role Separation - Clusterware
Installing 11gR2 (11.2.0.3) GI with Role Separation on RHEL 6
Installing 11gR2 (11.2.0.3) GI with Role Separation on OEL 6
Installing 11gR2 Standalone Server with ASM and Role Separation on RHEL 6
11gR2 Standalone Data Guard (with ASM and Role Separation)

Saturday, June 19, 2021

Installing Oracle Restart Without ASM

By default Oracle resstart requires at least one ASM disk group to be created during the installation. This post shows steps for installing Oracle restart without creating any ASM disk group.
1. First step in this process is to install the grid infrastructure using the "software only" option. If OUI is used this will be the "Set up Software Only" option. For this post the test steup was done using the grid response file. The response file indicate which section to fill to do a software only instllation.
## To register software for 'Grid Infrastructure'                            ##
##  - Fill out sections A,B and D                                            ##
##  - Provide the cluster nodes in section D when choosing CRS_SWONLY as     ##
##    installation option in section A                                       ##
Section A consists of information for oraIneventory, oracle base and installation option.
#-------------------------------------------------------------------------------
# Specify the location which holds the inventory files.
# This is an optional parameter if installing on
# Windows based Operating System.
#-------------------------------------------------------------------------------
INVENTORY_LOCATION=/opt/app/oraInventory

#-------------------------------------------------------------------------------
# Specify the installation option.
# Allowed values: CRS_CONFIG or HA_CONFIG or UPGRADE or CRS_SWONLY or HA_SWONLY
#   - CRS_CONFIG  : To register home and configure Grid Infrastructure for cluster
#   - HA_CONFIG   : To register home and configure Grid Infrastructure for stand alone server
#   - UPGRADE     : To register home and upgrade clusterware software of earlier release
#   - CRS_SWONLY  : To register Grid Infrastructure Software home (can be configured for cluster
#                   or stand alone server later)
#   - HA_SWONLY   : To register Grid Infrastructure Software home (can be configured for stand
#                   alone server later. This is only supported on Windows.)
#   - CRS_ADDNODE : To add more nodes to the cluster
#   - CRS_DELETE_NODE : To delete nodes to the cluster
#-------------------------------------------------------------------------------
oracle.install.option=CRS_SWONLY

#-------------------------------------------------------------------------------
# Specify the complete path of the Oracle Base.
#-------------------------------------------------------------------------------
ORACLE_BASE=/opt/app/oracle
Section B specify ASM related privileged user groups. Even though ASM is not configured in this case, it is possible to use the same set of user group that would be used in a ASM setup. If not setup the group appropriatly for the enviornment being setup.
################################################################################
#                                                                              #
#                              SECTION B - GROUPS                              #
#                                                                              #
#   The following three groups need to be assigned for all GI installations.   #
#   OSDBA and OSOPER can be the same or different.  OSASM must be different    #
#   than the other two.                                                        #
#   The value to be specified for OSDBA, OSOPER and OSASM group is only for    #
#   Unix based Operating System.                                               #
#   These groups are not required for upgrades, as they will be determined     #
#   from the Oracle home to upgrade.                                           #
#                                                                              #
################################################################################
#-------------------------------------------------------------------------------
# The OSDBA_GROUP is the OS group which is to be granted SYSDBA privileges.
#-------------------------------------------------------------------------------
oracle.install.asm.OSDBA=asmdba

#-------------------------------------------------------------------------------
# The OSOPER_GROUP is the OS group which is to be granted SYSOPER privileges.
# The value to be specified for OSOPER group is optional.
# Value should not be provided if configuring Client Cluster - i.e. storageOption=CLIENT_ASM_STORAGE.
#-------------------------------------------------------------------------------
oracle.install.asm.OSOPER=asmoper

#-------------------------------------------------------------------------------
# The OSASM_GROUP is the OS group which is to be granted SYSASM privileges. This
# must be different than the previous two.
#-------------------------------------------------------------------------------
oracle.install.asm.OSASM=asmadmin
Section D has many parameters but for Oracle restart setup only the following is needed to be filled, which specify the hostname.
################################################################################
#                                                                              #
#                           SECTION D - CLUSTER & GNS                         #
#                                                                              #
################################################################################
#-------------------------------------------------------------------------------
#
#-------------------------------------------------------------------------------
oracle.install.crs.config.clusterNodes=ip-172-31-7-187

#-------------------------------------------------------------------------------
2. Install the grid infrastructure using the response file.
./gridSetup.sh -silent -responseFile grid.rsp
3. At the end of the installation the grid infrastructure would be configured to an Oracle restart configuration by running roothas.sh in GI_HOME/crs/install as the root user.
./roothas.sh
Using configuration parameter file: /opt/app/oracle/product/19.x.0/grid/crs/install/crsconfig_params
The log of current session can be found at:
  /opt/app/oracle/crsdata/ip-172-31-12-240/crsconfig/roothas_2021-02-15_04-09-40PM.log
2021/02/15 16:09:41 CLSRSC-363: User ignored prerequisites during installation
Redirecting to /bin/systemctl restart rsyslog.service
LOCAL ADD MODE
Creating OCR keys for user 'oracle', privgrp 'oinstall'..
Operation successful.
LOCAL ONLY MODE
Successfully accumulated necessary OCR keys.
Creating OCR keys for user 'root', privgrp 'root'..
Operation successful.
CRS-4664: Node ip-172-31-12-240 successfully pinned.
2021/02/15 16:10:08 CLSRSC-330: Adding Clusterware entries to file 'oracle-ohasd.service'

ip-172-31-12-240     2021/02/15 16:12:24     /opt/app/oracle/crsdata/ip-172-31-12-240/olr/backup_20210215_161224.olr     1944883066
2021/02/15 16:12:25 CLSRSC-327: Successfully configured Oracle Restart for a standalone server
4. At this stage the resource states would be as below
Resource Name             Type                      Target             State              Host
-------------             ------                    -------            --------           ----------
ora.cssd                  ora.cssd.type             OFFLINE            OFFLINE
ora.diskmon               ora.diskmon.type          OFFLINE            OFFLINE
ora.evmd                  ora.evm.type              ONLINE             ONLINE             ip-172-31-7-187
ora.ons                   ora.ons.type              OFFLINE            OFFLINE
It is important to have the cssd status online. Without it, when managing the databases following errors is thrown
$ srvctl start database -db testfs
PRCD-1024 : Failed to retrieve instance list for database testfs
PRCR-1055 : Cluster membership check failed for node ip-172-31-12-240
5. Enable the cssd to auto start and restart HAS.
crsctl modify resource "ora.cssd" -attr "AUTO_START=1" -unsupported
crsctl stop has
crsctl start has -nowait

Resource Name             Type                      Target             State              Host
-------------             ------                    -------            --------           ----------
ora.cssd                  ora.cssd.type             ONLINE             ONLINE             ip-172-31-7-187
ora.diskmon               ora.diskmon.type          OFFLINE            OFFLINE
ora.evmd                  ora.evm.type              ONLINE             ONLINE             ip-172-31-7-187
ora.ons                   ora.ons.type              OFFLINE            OFFLINE


6. Add listener
srvctl add listener -endpoints tcp:1521
srvctl start listener

Resource Name             Type                      Target             State              Host
-------------             ------                    -------            --------           ----------
ora.LISTENER.lsnr         ora.listener.type         ONLINE             ONLINE             ip-172-31-7-187
ora.cssd                  ora.cssd.type             ONLINE             ONLINE             ip-172-31-7-187
ora.diskmon               ora.diskmon.type          OFFLINE            OFFLINE
ora.evmd                  ora.evm.type              ONLINE             ONLINE             ip-172-31-7-187
ora.ons                   ora.ons.type              OFFLINE            OFFLINE
7. Enable ONS if this is used for data guard and client failover is setup.
srvctl enable ons
srvctl start ons

Resource Name             Type                      Target             State              Host
-------------             ------                    -------            --------           ----------
ora.LISTENER.lsnr         ora.listener.type         ONLINE             ONLINE             ip-172-31-7-187
ora.cssd                  ora.cssd.type             ONLINE             ONLINE             ip-172-31-7-187
ora.diskmon               ora.diskmon.type          OFFLINE            OFFLINE
ora.evmd                  ora.evm.type              ONLINE             ONLINE             ip-172-31-7-187
ora.ons                   ora.ons.type              ONLINE             ONLINE             ip-172-31-7-187
8. Create the CDB. File system is given as the storage type for CDB and two directories are specified for datafileDestination and recoveryAreaDestination. These gets set to db_create_file_dest and db_recovery_file_dest since OMF is set to true. The CDB will be automatically registered with the HAS service and could be managed with srvctl commands.
dbca -createDatabase -gdbName testfs -templateName /home/oracle/New_Database.dbt 
-characterSet AL32UTF8 -emConfiguration DBEXPRESS 
-storageType FS -datafileDestination  /opt/data  
-recoveryAreaDestination /opt/fra 
-sysPassword testCDB1234 -systemPassword testCDB1234 
-createAsContainerDatabase true 
-memoryMgmtType AUTO_SGA  -enableArchive false 
-useOMF true  -nationalCharacterSet AL16UTF16 
-databaseConfigType SINGLE -silent

Resource Name             Type                      Target             State              Host
-------------             ------                    -------            --------           ----------
ora.LISTENER.lsnr         ora.listener.type         ONLINE             ONLINE             ip-172-31-7-187
ora.cssd                  ora.cssd.type             ONLINE             ONLINE             ip-172-31-7-187
ora.diskmon               ora.diskmon.type          OFFLINE            OFFLINE
ora.evmd                  ora.evm.type              ONLINE             ONLINE             ip-172-31-7-187
ora.ons                   ora.ons.type              ONLINE             ONLINE             ip-172-31-7-187
ora.testfs.db             ora.database.type         ONLINE             ONLINE             ip-172-31-7-187
9. Create the PDB
dbca -silent -createPluggableDatabase -pdbName testpdb -sourceDB $ORACLE_SID -createUserTableSpace true -pdbAdminPassword adminPBD123
10. If a data guard configuraiton is created from a similar setup and data guard broker is created then it will detect the presence of clusterware.
DGMGRL> validate database testfs2

  Database Role:     Physical standby database
  Primary Database:  testfs

  Ready for Switchover:  Yes
  Ready for Failover:    Yes (Primary Running)

  Managed by Clusterware:
    testfs :  YES
    testfs2:  YES
Related Posts
Oracle Extended Cluster Setup on 19c
Installing 19c (19.3) RAC on RHEL 7 Using Response File
Installing 18c (18.3) RAC on RHEL 7 with Role Separation - Clusterware
Installing 12cR2 (12.2.0.1) RAC on RHEL 6 with Role Separation - Clusterware
Installing 12c (12.1.0.2) Flex Cluster on RHEL 6 with Role Separation
Installing 12c (12.1.0.1) RAC on RHEL 6 with Role Separation - Clusterware
Installing 11gR2 (11.2.0.3) GI with Role Separation on RHEL 6
Installing 11gR2 (11.2.0.3) GI with Role Separation on OEL 6
Installing 11gR2 Standalone Server with ASM and Role Separation on RHEL 6
11gR2 Standalone Data Guard (with ASM and Role Separation)

Friday, May 3, 2019

Upgrading Oracle Restart from 18c (18.6) to 19c (19.3)

This post lists the steps for upgrading an Oracle restart environment (Single instance non-CDB on ASM) from 18.6 to 19.3. The 18c setup is on RHEL 7. The OS and kernel versions are as follows
cat /etc/redhat-release
Red Hat Enterprise Linux Server release 7.6 (Maipo)

uname -r
3.10.0-957.el7.x86_64
The current versions of the GI are
crsctl query has releaseversion
Oracle High Availability Services release version on the local node is [18.0.0.0.0]
crsctl query has softwareversion
Oracle High Availability Services version on the local node is [18.0.0.0.0]
The Oracle restart environment used is not a role separated setup, both Oracle and GI homes are installed using oracle user.
Download and run orachk -u -o pre (1268927.2) on the 18c installation to identify any required patches before the upgrade. With the above 18.6 RU applied no other patches were required be applied prior to the upgrade.
19c grid software instillation is also similar to 18c and is based on a image file. Before unzipping the GI image file create the 19c GI home directory and then unzip the GI image file into it.
mkdir -p /opt/app/oracle/product/19.x.0/grid
unzip LINUX.X64_193000_grid_home.zip -d /opt/app/oracle/product/19.x.0/grid
Use cluvfy with hacfg to verify pre-reqs. The SWAP size failure shown is ignorable on a test system.
cd /opt/app/oracle/product/19.x.0/grid/

./runcluvfy.sh stage -pre hacfg

Verifying Physical Memory ...PASSED
Verifying Available Physical Memory ...PASSED
Verifying Swap Size ...FAILED (PRVF-7573)
Verifying Free Space: ip-172-31-2-77:/usr,ip-172-31-2-77:/var,ip-172-31-2-77:/etc,ip-172-31-2-77:/sbin,ip-172-31-2-77:/tmp ...PASSED
Verifying User Existence: oracle ...
  Verifying Users With Same UID: 501 ...PASSED
Verifying User Existence: oracle ...PASSED
Verifying Group Existence: dba ...PASSED
Verifying Group Existence: oinstall ...PASSED
Verifying Group Membership: oinstall(Primary) ...PASSED
Verifying Group Membership: dba ...PASSED
Verifying Run Level ...PASSED
Verifying Architecture ...PASSED
Verifying OS Kernel Version ...PASSED
Verifying OS Kernel Parameter: semmsl ...PASSED
Verifying OS Kernel Parameter: semmns ...PASSED
Verifying OS Kernel Parameter: semopm ...PASSED
Verifying OS Kernel Parameter: semmni ...PASSED
Verifying OS Kernel Parameter: shmmax ...PASSED
Verifying OS Kernel Parameter: shmmni ...PASSED
Verifying OS Kernel Parameter: shmall ...PASSED
Verifying OS Kernel Parameter: file-max ...PASSED
Verifying OS Kernel Parameter: ip_local_port_range ...PASSED
Verifying OS Kernel Parameter: rmem_default ...PASSED
Verifying OS Kernel Parameter: rmem_max ...PASSED
Verifying OS Kernel Parameter: wmem_default ...PASSED
Verifying OS Kernel Parameter: wmem_max ...PASSED
Verifying OS Kernel Parameter: aio-max-nr ...PASSED
Verifying Package: kmod-20-21 (x86_64) ...PASSED
Verifying Package: kmod-libs-20-21 (x86_64) ...PASSED
Verifying Package: binutils-2.23.52.0.1 ...PASSED
Verifying Package: compat-libcap1-1.10 ...PASSED
Verifying Package: libgcc-4.8.2 (x86_64) ...PASSED
Verifying Package: libstdc++-4.8.2 (x86_64) ...PASSED
Verifying Package: libstdc++-devel-4.8.2 (x86_64) ...PASSED
Verifying Package: sysstat-10.1.5 ...PASSED
Verifying Package: gcc-c++-4.8.2 ...PASSED
Verifying Package: ksh ...PASSED
Verifying Package: make-3.82 ...PASSED
Verifying Package: glibc-2.17 (x86_64) ...PASSED
Verifying Package: glibc-devel-2.17 (x86_64) ...PASSED
Verifying Package: libaio-0.3.109 (x86_64) ...PASSED
Verifying Package: libaio-devel-0.3.109 (x86_64) ...PASSED
Verifying Package: nfs-utils-1.2.3-15 ...PASSED
Verifying Package: smartmontools-6.2-4 ...PASSED
Verifying Package: net-tools-2.0-0.17 ...PASSED
Verifying Package: compat-libstdc++-33-3.2.3 (x86_64) ...PASSED
Verifying Package: libxcb-1.11 (x86_64) ...PASSED
Verifying Package: libX11-1.6.3 (x86_64) ...PASSED
Verifying Package: libXau-1.0.8 (x86_64) ...PASSED
Verifying Package: libXi-1.7.4 (x86_64) ...PASSED
Verifying Package: libXtst-1.2.2 (x86_64) ...PASSED
Verifying Users With Same UID: 0 ...PASSED
Verifying Current Group ID ...PASSED
Verifying Root user consistency ...PASSED

Pre-check for Oracle Restart configuration was unsuccessful.


Failures were encountered during execution of CVU verification request "stage -pre hacfg".

Verifying Swap Size ...FAILED
ip-172-31-2-77: PRVF-7573 : Sufficient swap size is not available on node
                "ip-172-31-2-77" [Required = 16GB (1.6777216E7KB) ; Found = 0.0
                bytes]
ASM will be upgraded as part of the upgrade process.
Therefore stop the database before starting the GI upgrade.
srvctl stop database -d gold
Start the GI upgrade by running the gridSetup.sh from the grid home.
cd /opt/app/oracle/product/19.x.0/grid
./gridSetup.sh
Select upgrade GI option.
Location of the GI home cannot be changed.
Upgrade summary page.
Run root upgrade script when prompted.
Following shows the output from running the rootugprade script.
# /opt/app/oracle/product/19.x.0/grid/rootupgrade.sh
Performing root user operation.

The following environment variables are set as:
    ORACLE_OWNER= oracle
    ORACLE_HOME=  /opt/app/oracle/product/19.x.0/grid

Enter the full pathname of the local bin directory: [/usr/local/bin]:
The contents of "dbhome" have not changed. No need to overwrite.
The contents of "oraenv" have not changed. No need to overwrite.
The contents of "coraenv" have not changed. No need to overwrite.

Entries will be added to the /etc/oratab file as needed by
Database Configuration Assistant when a database is created
Finished running generic part of root script.
Now product-specific root actions will be performed.
Using configuration parameter file: /opt/app/oracle/product/19.x.0/grid/crs/install/crsconfig_params
The log of current session can be found at:
  /opt/app/oracle/crsdata/ip-172-31-2-77/crsconfig/roothas_2019-05-02_11-06-31AM.log
2019/05/02 11:06:34 CLSRSC-595: Executing upgrade step 1 of 12: 'UpgPrechecks'.
2019/05/02 11:06:37 CLSRSC-363: User ignored prerequisites during installation
2019/05/02 11:06:37 CLSRSC-595: Executing upgrade step 2 of 12: 'GetOldConfig'.
2019/05/02 11:06:41 CLSRSC-595: Executing upgrade step 3 of 12: 'GenSiteGUIDs'.
2019/05/02 11:06:41 CLSRSC-595: Executing upgrade step 4 of 12: 'SetupOSD'.
2019/05/02 11:06:41 CLSRSC-595: Executing upgrade step 5 of 12: 'PreUpgrade'.

ASM has been upgraded and started successfully.

2019/05/02 11:07:21 CLSRSC-595: Executing upgrade step 6 of 12: 'UpgradeAFD'.
2019/05/02 11:07:22 CLSRSC-595: Executing upgrade step 7 of 12: 'UpgradeOLR'.
clscfg: EXISTING configuration version 0 detected.
Creating OCR keys for user 'oracle', privgrp 'oinstall'..
Operation successful.
2019/05/02 11:07:26 CLSRSC-595: Executing upgrade step 8 of 12: 'UpgradeOCR'.
LOCAL ONLY MODE
Successfully accumulated necessary OCR keys.
Creating OCR keys for user 'root', privgrp 'root'..
Operation successful.
CRS-4664: Node ip-172-31-2-77 successfully pinned.
2019/05/02 11:07:29 CLSRSC-595: Executing upgrade step 9 of 12: 'CreateOHASD'.
2019/05/02 11:07:30 CLSRSC-595: Executing upgrade step 10 of 12: 'ConfigOHASD'.
2019/05/02 11:07:30 CLSRSC-329: Replacing Clusterware entries in file 'oracle-ohasd.service'
2019/05/02 11:07:50 CLSRSC-595: Executing upgrade step 11 of 12: 'UpgradeSIHA'.

ip-172-31-2-77     2019/05/02 07:08:28     /opt/app/oracle/crsdata/ip-172-31-2-77/olr/backup_20190502_070828.olr     724960844

ip-172-31-2-77     2019/05/02 05:23:49     /opt/app/oracle/product/18.x.0/grid/cdata/ip-172-31-2-77/backup_20190502_052349.olr     2532936542
2019/05/02 11:08:28 CLSRSC-595: Executing upgrade step 12 of 12: 'InstallACFS'.
2019/05/02 11:10:08 CLSRSC-327: Successfully configured Oracle Restart for a standalone server
Click OK on the execution configuration to proceed with the rest of the upgrade steps. Following shows the end of the upgrade page.
The HAS software is now upgraded to 19c.
crsctl query has releaseversion
Oracle High Availability Services release version on the local node is [19.0.0.0.0]

crsctl query has softwareversion
Oracle High Availability Services version on the local node is [19.0.0.0.0]
If the ASM spfile was moved to $GI_HOME/dbs (described in step 12 in an earlier post) then this need to be moved to 19c GI_HOME.
ASMCMD> spget
/opt/app/oracle/product/18.x.0/grid/dbs/spfile+ASM.ora
ASMCMD> spcopy /opt/app/oracle/product/18.x.0/grid/dbs/spfile+ASM.ora  /opt/app/oracle/product/19.x.0/grid/dbs/spfile+ASM.ora
ASMCMD> spset /opt/app/oracle/product/19.x.0/grid/dbs/spfile+ASM.ora
ASMCMD> spget
/opt/app/oracle/product/19.x.0/grid/dbs/spfile+ASM.ora
Use cluvfy post check validate as follows
cluvfy stage -post hacfg

Verifying Oracle Restart Integrity ...PASSED
Verifying OLR Integrity ...PASSED

Post-check for Oracle Restart configuration was successful.

CVU operation performed:      stage -post hacfg
Date:                         May 2, 2019 11:43:30 AM
CVU home:                     /opt/app/oracle/product/19.x.0/grid/
User:                         oracle


Next step is to upgrade the database software. Similar to GI home instillation, this too is based on image. Create the 19c oracle home location and unzip the DB software image file into it.
mkdir -p /opt/app/oracle/product/19.x.0/dbhome_1
unzip LINUX.X64_193000_db_home.zip -d /opt/app/oracle/product/19.x.0/dbhome_1
To begin the installation execute runInstaller from Oracle home location.
cd /opt/app/oracle/product/19.x.0/dbhome_1
./runInstaller
Select software only setup for the instillation option.
Select single database installation as this is an Oracle restart setup.
Select appropriate edition based on the licensing.
What is interesting in the above is that SE2 no longer mentions RAC usages where as in 18c it did. With 19c, RAC is not an option available under SE2.
Oracle home location is fixed and the location is where the DB software was unzipped.
There are no new OS groups introduced in 19c. So all the OS groups used 18c are used here as well.
DB software installation summary.
When prompted run the root script. Unlike 18c there's no prompt for installing TFA. A standalone TFA is setup as part of 19c.
# /opt/app/oracle/product/19.x.0/dbhome_1/root.sh
Performing root user operation.

The following environment variables are set as:
    ORACLE_OWNER= oracle
    ORACLE_HOME=  /opt/app/oracle/product/19.x.0/dbhome_1

Enter the full pathname of the local bin directory: [/usr/local/bin]:
The contents of "dbhome" have not changed. No need to overwrite.
The contents of "oraenv" have not changed. No need to overwrite.
The contents of "coraenv" have not changed. No need to overwrite.

Entries will be added to the /etc/oratab file as needed by
Database Configuration Assistant when a database is created
Finished running generic part of root script.
Now product-specific root actions will be performed.
Oracle Trace File Analyzer (TFA - Standalone Mode) is available at :
    /opt/app/oracle/product/19.x.0/dbhome_1/bin/tfactl

Note :
1. tfactl will use TFA Service if that service is running and user has been granted access
2. tfactl will configure TFA Standalone Mode only if user has no access to TFA Service or TFA is not installed


After the database software is installed next step is upgrade of the database. 19c has the option of autoupgrade (which is also backported to 12.2 and 18c) which automates the upgrade process. However, in this post the DB will be upgraded using the DBUA. Run preupgrade.jar available in the 19c home (19c_home/rdbms/admin) to check the upgrade readiness of the database (for more refer 2421552.1)
 $ORACLE_HOME/jdk/bin/java -jar preupgrade.jar TERMINAL
Report generated by Oracle Database Pre-Upgrade Information Tool Version
19.0.0.0.0 Build: 1 on 2019-05-02T12:16:42

Upgrade-To version: 19.0.0.0.0

=======================================
Status of the database prior to upgrade
=======================================
      Database Name:  GOLD
     Container Name:  gold
       Container ID:  0
            Version:  18.0.0.0.0
     DB Patch Level:  Database Release Update : 18.6.0.0.190416 (29301631)
         Compatible:  18.0.0
          Blocksize:  8192
           Platform:  Linux x86 64-bit
      Timezone File:  31
  Database log mode:  NOARCHIVELOG
           Readonly:  FALSE
            Edition:  EE

  Oracle Component                       Upgrade Action    Current Status
  ----------------                       --------------    --------------
  Oracle Server                          [to be upgraded]  VALID
  Real Application Clusters              [to be upgraded]  OPTION OFF
  Oracle Workspace Manager               [to be upgraded]  VALID
  Oracle Text                            [to be upgraded]  VALID
  Oracle XML Database                    [to be upgraded]  VALID

==============
BEFORE UPGRADE
==============

  REQUIRED ACTIONS
  ================
  None

  RECOMMENDED ACTIONS
  ===================
  1.  (AUTOFIXUP) Gather stale data dictionary statistics prior to database
      upgrade in off-peak time using:

        EXECUTE DBMS_STATS.GATHER_DICTIONARY_STATS;

      Dictionary statistics do not exist or are stale (not up-to-date).

      Dictionary statistics help the Oracle optimizer find efficient SQL
      execution plans and are essential for proper upgrade timing. Oracle
      recommends gathering dictionary statistics in the last 24 hours before
      database upgrade.

      For information on managing optimizer statistics, refer to the 18.0.0.0
      Oracle Database Upgrade Guide.

  2.  (AUTOFIXUP) Gather statistics on fixed objects prior the upgrade.

      None of the fixed object tables have had stats collected.

      Gathering statistics on fixed objects, if none have been gathered yet, is
      recommended prior to upgrading.

      For information on managing optimizer statistics, refer to the 18.0.0.0
      Oracle Database Upgrade Guide.

  INFORMATION ONLY
  ================
  3.  To help you keep track of your tablespace allocations, the following
      AUTOEXTEND tablespaces are expected to successfully EXTEND during the
      upgrade process.

                                                 Min Size
      Tablespace                        Size     For Upgrade
      ----------                     ----------  -----------
      TEMP                                20 MB       150 MB
      UNDOTBS1                           365 MB       412 MB

      Minimum tablespace sizes for upgrade are estimates.

  4.  Check the Oracle Backup and Recovery User's Guide for information on how
      to manage an RMAN recovery catalog schema.

      If you are using a version of the recovery catalog schema that is older
      than that required by the RMAN client version, then you must upgrade the
      catalog schema.

      It is good practice to have the catalog schema the same or higher version
      than the RMAN client version you are using.

  ORACLE GENERATED FIXUP SCRIPT
  =============================
  All of the issues in database GOLD
  which are identified above as BEFORE UPGRADE "(AUTOFIXUP)" can be resolved by
  executing the following

    SQL>@/opt/app/oracle/cfgtoollogs/gold/preupgrade/preupgrade_fixups.sql

=============
AFTER UPGRADE
=============

  REQUIRED ACTIONS
  ================
  None

  RECOMMENDED ACTIONS
  ===================
  5.  Upgrade the database time zone file using the DBMS_DST package.

      The database is using time zone file version 31 and the target 19 release
      ships with time zone file version 32.

      Oracle recommends upgrading to the desired (latest) version of the time
      zone file.  For more information, refer to "Upgrading the Time Zone File
      and Timestamp with Time Zone Data" in the 19 Oracle Database
      Globalization Support Guide.

  6.  (AUTOFIXUP) Gather dictionary statistics after the upgrade using the
      command:

        EXECUTE DBMS_STATS.GATHER_DICTIONARY_STATS;

      Oracle recommends gathering dictionary statistics after upgrade.

      Dictionary statistics provide essential information to the Oracle
      optimizer to help it find efficient SQL execution plans. After a database
      upgrade, statistics need to be re-gathered as there can now be tables
      that have significantly changed during the upgrade or new tables that do
      not have statistics gathered yet.

  7.  Gather statistics on fixed objects after the upgrade and when there is a
      representative workload on the system using the command:

        EXECUTE DBMS_STATS.GATHER_FIXED_OBJECTS_STATS;

      This recommendation is given for all preupgrade runs.

      Fixed object statistics provide essential information to the Oracle
      optimizer to help it find efficient SQL execution plans.  Those
      statistics are specific to the Oracle Database release that generates
      them, and can be stale upon database upgrade.

      For information on managing optimizer statistics, refer to the 18.0.0.0
      Oracle Database Upgrade Guide.

  ORACLE GENERATED FIXUP SCRIPT
  =============================
  All of the issues in database GOLD
  which are identified above as AFTER UPGRADE "(AUTOFIXUP)" can be resolved by
  executing the following

    SQL>@/opt/app/oracle/cfgtoollogs/gold/preupgrade/postupgrade_fixups.sql


==================
PREUPGRADE SUMMARY
==================
  /opt/app/oracle/cfgtoollogs/gold/preupgrade/preupgrade.log
  /opt/app/oracle/cfgtoollogs/gold/preupgrade/preupgrade_fixups.sql
  /opt/app/oracle/cfgtoollogs/gold/preupgrade/postupgrade_fixups.sql

Execute fixup scripts as indicated below:

Before upgrade:

Log into the database and execute the preupgrade fixups
@/opt/app/oracle/cfgtoollogs/gold/preupgrade/preupgrade_fixups.sql

After the upgrade:

Log into the database and execute the postupgrade fixups
@/opt/app/oracle/cfgtoollogs/gold/preupgrade/postupgrade_fixups.sql

Preupgrade complete: 2019-05-02T12:16:42
Run the pre-upgrade fixup script and then DBUA from the 19c home. Select the database to upgrade.
Check and resolve any validation concerns.
Parallel upgrade will speed up the upgrade process. This step also allows to specify whether timezone is also upgraded at the same time as the database.
The upgrade summary page.
Upgrade progress.
Upgrade result page.
Once the upgrade has finished execute the post-upgrade fixup script (mentioned in the output when preupgrade.jar was run). The DB components versions and status after the upgrade is as follows.
SQL> select comp_name,status,version,version_full from cdb_registry order by 1,2;

COMP_NAME                                STATUS          VERSION         VERSION_FULL
---------------------------------------- --------------- --------------- ---------------
Oracle Database Catalog Views            VALID           19.0.0.0.0      19.3.0.0.0
Oracle Database Packages and Types       VALID           19.0.0.0.0      19.3.0.0.0
Oracle Real Application Clusters         OPTION OFF      19.0.0.0.0      19.3.0.0.0
Oracle Text                              VALID           19.0.0.0.0      19.3.0.0.0
Oracle Workspace Manager                 VALID           19.0.0.0.0      19.3.0.0.0
Oracle XML Database                      VALID           19.0.0.0.0      19.3.0.0.0

6 rows selected.
The timezone file has been upgraded to 32.
SQL> select * from v$timezone_file;

FILENAME                     VERSION     CON_ID
-------------------- --------------- ----------
timezlrg_32.dat                   32          0
If satisfied with the upgrade and application testing then change the compatibility parameter on the DB and ASM disk groups.
SQL> alter system set compatible='19.0.0' scope=spfile;
shutdown immediate;
Login as grid user and then login to ASM instance as sysasm to change asm compatibility parameters.
SQL> alter diskgroup FRA SET attribute 'compatible.asm'='19.0.0.0.0';
SQL> alter diskgroup DATA  SET attribute 'compatible.asm'='19.0.0.0.0';
SQL> alter diskgroup fra set attribute 'compatible.rdbms'='19.0.0.0.0';
SQL> alter diskgroup data set attribute 'compatible.rdbms'='19.0.0.0.0';

SQL> select g.name,a.name,a.value from v$asm_diskgroup g, v$asm_attribute a where g.group_number=a.group_number and a.name like '%compat%';

NAME                 NAME                 VALUE
-------------------- -------------------- --------------------
DATA                 compatible.asm       19.0.0.0.0
DATA                 compatible.rdbms     19.0.0.0.0
FRA                  compatible.asm       19.0.0.0.0
FRA                  compatible.rdbms     19.0.0.0.0
After ASM compatibility parameters are updated start the database.
Finally run orachk -u -o post check the post upgrade state of the oracle restart setup.

Related Posts
Upgrading Oracle Restart from 12.2.0.1 to 18c
Upgrading Oracle Single Instance with ASM (Oracle Restart) from 11.2.0.4 to 12.2.0.1
Upgrading Oracle Single Instance with ASM (Oracle Restart) from 12.1.0.2 to 12.2.0.1
Upgrading Single Instance on ASM from 11.2.0.3 to 11.2.0.4
Upgrading Grid Infrastructure Used for Single Instance from 11.2.0.4 to 12.1.0.2