

As part of adding targets the EM agent is deployed on remote host. In this deployment the agent is installed under OS user "asanga". The host where agent is deployed has Oracle restart 19c running under Oracle user. In such cases the user under which agent is installed must have read,write permission on the Oracle inventory. If not following error will occur at the time of agent deployment.

To fix the above issue add the user under which agent is installed to oracle inventory group (oinstall). If there's no Oracle products installed then there'll be no oracle inventory and no need to add any other group to the user.
Secondly certain root scripts get executed as part of the agent deployment. Therefore a privilege user credentials has to be specified during agent deployment. One way to get the root script to execute under the user agent being installed is to give the user sudo rights. For this setup following could be added to /etc/sudoers
asanga ALL=(ALL) ALLIt gives unrestricted privileges but only required for the duration of the agent deployment. Afterwards could be removed from the /etc/sudoers.
If more restricted sudo command list is needed then use the following. It has minimum required commands for deploying agents on 13.3.
asanga ALL=(ALL) /bin/ls, /bin/sh, /usr/bin/id, /bin/chmod, /bin/chown, /bin/cp, /bin/mkdir, /bin/rm, /bin/tar, /home/asanga/agent/agent_inst/bin/emctl, /home/asanga/agent/*/agentdeployroot.sh, /home/asanga/agent/*/unzip, /home/asanga/agent/*/unzipTmp/unzip, /home/asanga/agent/*/agentcore.bin, /home/asanga/agent/*/root.sh
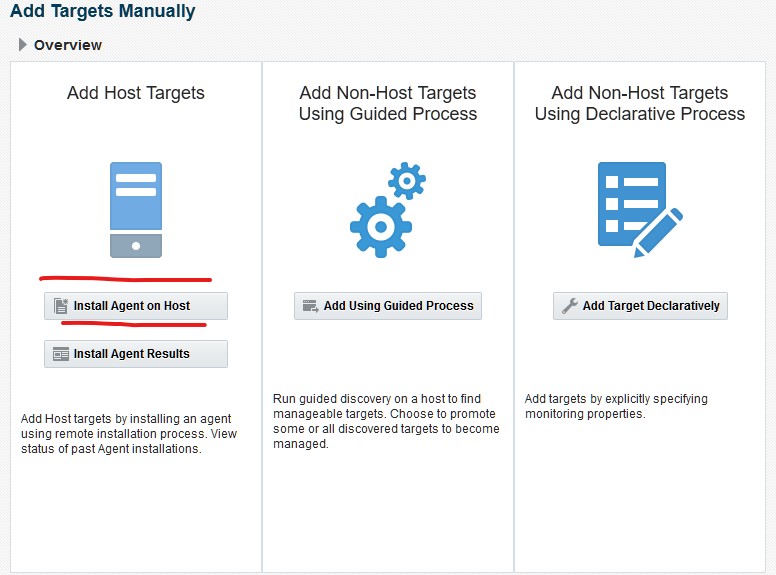
1. To add target manually, select Setup -> Add Target -> Add Targets Manually

2. Select Install agent on Host
3. Select Manually from the Add drop down button.

4. Specify the host name (or IP, but host names are preferred). The host name must be resolvable on the host where EM console is setup and EM console host name must be resolvable on the agent host. If DNS is not used for host name resolving then add the hostnames to /etc/hosts.

5. For the deployment type select fresh agent installation. This is selected by default.

6. This page will show the agent version, platform and the host it will be deployed to.

8. This will open the create new named credential dialog box. Specify the login credential for the host for the user installing the agent. In this case the login credntails for user asanga is specified. Since user asanga also has sudo privilege (as shown beginning of the post) run privilege is selected to sudo and asked to run as asanga. Give the named credential a name that will allow it to be identified easily. In this case user and hostname combination is chosen.

9. Once named user credential is created return to previous page and select it for both named user and root credential.

10. Review and press the deploy button.

11. Agent deployment happens in 3 phases. Initialization, pre-check and deployment.
If any sub action/item fails then agent deployment could be return (using the rerun button) after the corrective actions. Below shows each item in the 3 phases mentioned above
Initialization.

Remote pre-req check.

Deployment.

12. Once the agent deployment is done go to targets -> hosts to view the host. (screen shot shows IP as it was taken from a subsequent deployment. If host name is specified it will show hostname here).

13. After few minutes the agent will auto discover the oracle products deployed on the host. These could be viewed from Setup -> Add Target -> Auto Discovery Results. The below screen shot shows agent has discovered the ASM and DB instances, listener, HAS (oracle restart stack), grid infrastructure and oracle homes.

14. Select each target and promote it to a monitored (by the agent) target. In this case the ASM instances is promoted first.

15. This will ask for the asmsnmp password. This must be a password file based user running on the ASM instance (not on DB instance). Also if the listener runs on a non-default port then click configure button to change the port and other information.

16. Review and promote the target.
17. Similarly all other targets could be promoted. But few things must be mentioned about DB instance promoting. If the connection to DB is restricted for new clients versions via
SQLNET.ALLOWED_LOGON_VERSION_SERVER=12athen agent connecting would fail as
This is a known issue documented on EM 13c: Can OEM Monitor 12.2 Databases That Use Parameter SQLNET.ALLOWED_LOGON_VERSION_SERVER=12a? (Doc ID 2461464.1). No solution at the time of this post. Only workaround is to lower the ALLOWED_LOGON_VERSION_SERVER value or remove it altogether.
Also the monitoring user used for DB is dbsnmp. However, the login kept failing for this user even though dbsnmp was included in password file of the database as per EM 12c, EM 13c: Adding a Dataguard Database in Enterprise Managaer 13c Cloud Control Fails with ORA-01017: invalid username/password (Doc ID 2534527.1). Using the sys user instead of dbsnmp worked.
Other point is related to license. Once the database is added as monitored target check/uncheck the relevant management packs with Management packs -> management pack access.

18. Finally once all the targets are added the entire Oracle restart (or any other setup) topology could be viewed. This shows how each target is connected to other.

Moreover when the cursor is moved to a particular target all targets that not dependent will be hidden showing only the dependent targets. Following show Oracle home has dependent DB. Both of them are dependent on the host.

Monitor Apache Tomcat
Following steps shows how to add a non-Oracle target. In this case an Apache Tomcat instance. First needed for this is to install the Apache Tomcat plugin for the Cloud console version. This could be done via Setup -> Extensibility -> Plugins.
However, if it is known beforehand then this could be done at the installation time.
1. As the first step deploy the agent to the host where tomcat is running as shown above.
2. Tomcat is monitored via java management extensions (JMX). This must be enabled on the tomcat instance. To do so add the following JVM entries to catalina.sh (or bat)
JAVA_OPTS="-Dcom.sun.management.jmxremote.port=3873
-Dcom.sun.management.jmxremote.password.file=/opt/tomcat/apache-tomcat-6.0.18/bin/jmxremote.password
-Dcom.sun.management.jmxremote.authenticate=true
-Dcom.sun.management.jmxremote.ssl=false
-Dcom.sun.management.jmxremote.access.file=/opt/tomcat/apache-tomcat-6.0.18/bin/jmxremote.access"
jmxremote.access and jmxremote.password files are available in JDK's jre/lib/management folder. Copy them to location where user running the tomcat can access and add entries for login into JMX. Access is created for emconsole user to perform read,write and otehr jmx operations.
cat jmxremote.access
emconsole   readwrite \
              create javax.management.monitor.*,javax.management.timer.* \
              unregister
Password is specified in the jxmremote.password file in "username password" format.cat jmxremote.password emconsole tomcatAbove details will be entered when tomcat instances is added to the cloud control.
3. Select add targets manually via setup -> add target. Then select Add target declaratively.

4. Specify the host and the target type Apache tomcat and press add.

5. This will open the Add target page. Fill the form with the JMX details setup earlier. The SSL entries are needed if tomcat is setup with SSL.

6. Click OK and wait for the confirmation.

7. Goto Targets -> Middleware and view the newly added tomcat target.

8. Topology could be viewed as before.

Related Posts
Installing Enterprise Manager Cloud Control 13c (13.3)
Installing Grid Control 11gR1 and Deploying Agents
Upgrading Grid Control 11g to 12c - 1


