Showing posts with label clone. Show all posts

Friday, June 21, 2019

Adding a Node to 18c RAC Using Cloning

This post shows steps of adding a node by way of cloning on 18c. On 19c, extending RAC by way of cloning is depreciated. However, the steps are still listed on 19c clusterware.
The post assumes all other pre-reqs related to adding a node have been completed. The new node is called rhel72.
1. As the first step create an image from an existing node. Steps in creating a gold image could be used for this.
2. Unzip gold image in the new node on the same directory structure as existing nodes.
3. Removing following files from the new node.
rm -rf $GI_HOME/network/admin/*.ora
rm -rf $GI_HOMEroot.sh*
4. Run gridsetup and select software only option.
Following is promoted about missing root.sh files. Ignore and click yes to continue.
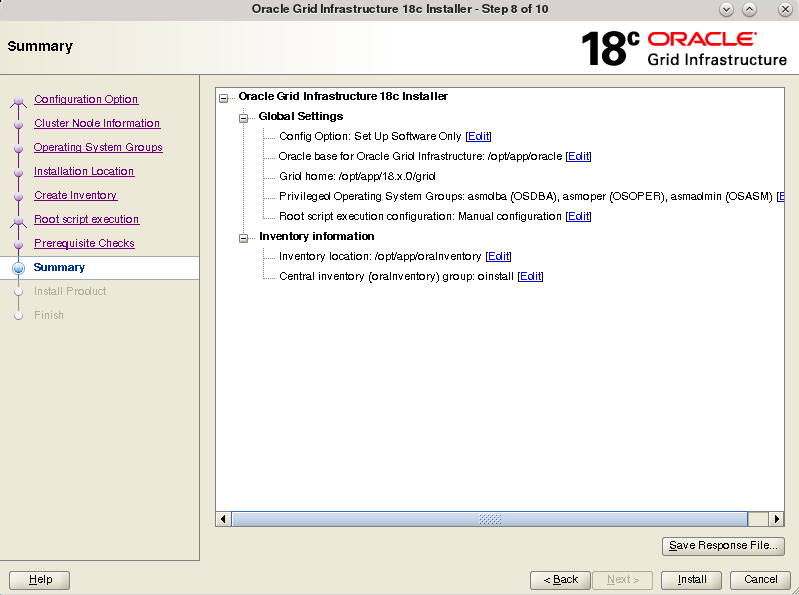
Summary of software only setup.
When prompted execute the root scripts.
Root script output is shown below.
# /opt/app/18.x.0/grid/root.sh
Performing root user operation.

The following environment variables are set as:
    ORACLE_OWNER= grid
    ORACLE_HOME=  /opt/app/18.x.0/grid

Creating /etc/oratab file...
Entries will be added to the /etc/oratab file as needed by
Database Configuration Assistant when a database is created
Finished running generic part of root script.
Now product-specific root actions will be performed.

To configure Grid Infrastructure for a Cluster or Grid Infrastructure for a Stand-Alone Server execute the following command as grid user:
/opt/app/18.x.0/grid/gridSetup.sh
This command launches the Grid Infrastructure Setup Wizard. The wizard also supports silent operation, and the parameters can be passed through the response file that is available in the installation media.
Complete the GI software only install.

5. From an existing node run gridSetup with noCopy option and select add node.
on exisitng node run
gridsetup.sh -noCopy
The noCopy option will prevent GI binaries being copied to remote node being added, since it's already has software installed. Rest of the steps for adding the node is same as previous add node post.Run the root.sh on the new node when prompted. Output from root.sh on the new node is shown below.
# /opt/app/18.x.0/grid/root.sh
Performing root user operation.

The following environment variables are set as:
    ORACLE_OWNER= grid
    ORACLE_HOME=  /opt/app/18.x.0/grid

Enter the full pathname of the local bin directory: [/usr/local/bin]:
The contents of "dbhome" have not changed. No need to overwrite.
The contents of "oraenv" have not changed. No need to overwrite.
The contents of "coraenv" have not changed. No need to overwrite.

Entries will be added to the /etc/oratab file as needed by
Database Configuration Assistant when a database is created
Finished running generic part of root script.
Now product-specific root actions will be performed.
Relinking oracle with rac_on option
Using configuration parameter file: /opt/app/18.x.0/grid/crs/install/crsconfig_params
The log of current session can be found at:
  /opt/app/oracle/crsdata/rhel72/crsconfig/rootcrs_rhel72_2019-04-09_11-10-41AM.log
2019/04/09 11:10:51 CLSRSC-594: Executing installation step 1 of 20: 'SetupTFA'.
2019/04/09 11:10:51 CLSRSC-4001: Installing Oracle Trace File Analyzer (TFA) Collector.
2019/04/09 11:11:32 CLSRSC-4002: Successfully installed Oracle Trace File Analyzer (TFA) Collector.
2019/04/09 11:11:32 CLSRSC-594: Executing installation step 2 of 20: 'ValidateEnv'.
2019/04/09 11:11:43 CLSRSC-363: User ignored prerequisites during installation
2019/04/09 11:11:44 CLSRSC-594: Executing installation step 3 of 20: 'CheckFirstNode'.
2019/04/09 11:11:45 CLSRSC-594: Executing installation step 4 of 20: 'GenSiteGUIDs'.
2019/04/09 11:11:50 CLSRSC-594: Executing installation step 5 of 20: 'SaveParamFile'.
2019/04/09 11:11:57 CLSRSC-594: Executing installation step 6 of 20: 'SetupOSD'.
2019/04/09 11:11:57 CLSRSC-594: Executing installation step 7 of 20: 'CheckCRSConfig'.
2019/04/09 11:12:34 CLSRSC-17: Invalid GPnP setup
2019/04/09 11:12:43 CLSRSC-594: Executing installation step 8 of 20: 'SetupLocalGPNP'.
2019/04/09 11:12:45 CLSRSC-594: Executing installation step 9 of 20: 'CreateRootCert'.
2019/04/09 11:12:45 CLSRSC-594: Executing installation step 10 of 20: 'ConfigOLR'.
2019/04/09 11:12:56 CLSRSC-594: Executing installation step 11 of 20: 'ConfigCHMOS'.
2019/04/09 11:12:56 CLSRSC-594: Executing installation step 12 of 20: 'CreateOHASD'.
2019/04/09 11:12:59 CLSRSC-594: Executing installation step 13 of 20: 'ConfigOHASD'.
2019/04/09 11:12:59 CLSRSC-330: Adding Clusterware entries to file 'oracle-ohasd.service'
2019/04/09 11:14:46 CLSRSC-594: Executing installation step 14 of 20: 'InstallAFD'.
2019/04/09 11:14:50 CLSRSC-594: Executing installation step 15 of 20: 'InstallACFS'.
CRS-2791: Starting shutdown of Oracle High Availability Services-managed resources on 'rhel72'
CRS-2793: Shutdown of Oracle High Availability Services-managed resources on 'rhel72' has completed
CRS-4133: Oracle High Availability Services has been stopped.
CRS-4123: Oracle High Availability Services has been started.
2019/04/09 11:16:15 CLSRSC-594: Executing installation step 16 of 20: 'InstallKA'.
2019/04/09 11:16:17 CLSRSC-594: Executing installation step 17 of 20: 'InitConfig'.
CRS-2791: Starting shutdown of Oracle High Availability Services-managed resources on 'rhel72'
CRS-2793: Shutdown of Oracle High Availability Services-managed resources on 'rhel72' has completed
CRS-4133: Oracle High Availability Services has been stopped.
CRS-4123: Oracle High Availability Services has been started.
CRS-2791: Starting shutdown of Oracle High Availability Services-managed resources on 'rhel72'
CRS-2673: Attempting to stop 'ora.drivers.acfs' on 'rhel72'
CRS-2677: Stop of 'ora.drivers.acfs' on 'rhel72' succeeded
CRS-2793: Shutdown of Oracle High Availability Services-managed resources on 'rhel72' has completed
CRS-4133: Oracle High Availability Services has been stopped.
2019/04/09 11:16:31 CLSRSC-594: Executing installation step 18 of 20: 'StartCluster'.
CRS-4123: Starting Oracle High Availability Services-managed resources
CRS-2672: Attempting to start 'ora.mdnsd' on 'rhel72'
CRS-2672: Attempting to start 'ora.evmd' on 'rhel72'
CRS-2676: Start of 'ora.mdnsd' on 'rhel72' succeeded
CRS-2676: Start of 'ora.evmd' on 'rhel72' succeeded
CRS-2672: Attempting to start 'ora.gpnpd' on 'rhel72'
CRS-2676: Start of 'ora.gpnpd' on 'rhel72' succeeded
CRS-2672: Attempting to start 'ora.gipcd' on 'rhel72'
CRS-2676: Start of 'ora.gipcd' on 'rhel72' succeeded
CRS-2672: Attempting to start 'ora.crf' on 'rhel72'
CRS-2672: Attempting to start 'ora.cssdmonitor' on 'rhel72'
CRS-2676: Start of 'ora.cssdmonitor' on 'rhel72' succeeded
CRS-2672: Attempting to start 'ora.cssd' on 'rhel72'
CRS-2672: Attempting to start 'ora.diskmon' on 'rhel72'
CRS-2676: Start of 'ora.diskmon' on 'rhel72' succeeded
CRS-2676: Start of 'ora.crf' on 'rhel72' succeeded
CRS-2676: Start of 'ora.cssd' on 'rhel72' succeeded
CRS-2672: Attempting to start 'ora.cluster_interconnect.haip' on 'rhel72'
CRS-2672: Attempting to start 'ora.ctssd' on 'rhel72'
CRS-2676: Start of 'ora.ctssd' on 'rhel72' succeeded
CRS-2676: Start of 'ora.cluster_interconnect.haip' on 'rhel72' succeeded
CRS-2672: Attempting to start 'ora.asm' on 'rhel72'
CRS-2676: Start of 'ora.asm' on 'rhel72' succeeded
CRS-2672: Attempting to start 'ora.storage' on 'rhel72'
CRS-2676: Start of 'ora.storage' on 'rhel72' succeeded
CRS-2672: Attempting to start 'ora.crsd' on 'rhel72'
CRS-2676: Start of 'ora.crsd' on 'rhel72' succeeded
CRS-6017: Processing resource auto-start for servers: rhel72
CRS-2673: Attempting to stop 'ora.LISTENER_SCAN1.lsnr' on 'rhel71'
CRS-2672: Attempting to start 'ora.ASMNET1LSNR_ASM.lsnr' on 'rhel72'
CRS-2672: Attempting to start 'ora.ons' on 'rhel72'
CRS-2672: Attempting to start 'ora.chad' on 'rhel72'
CRS-2676: Start of 'ora.ASMNET1LSNR_ASM.lsnr' on 'rhel72' succeeded
CRS-2672: Attempting to start 'ora.asm' on 'rhel72'
CRS-2676: Start of 'ora.chad' on 'rhel72' succeeded
CRS-2677: Stop of 'ora.LISTENER_SCAN1.lsnr' on 'rhel71' succeeded
CRS-2673: Attempting to stop 'ora.scan1.vip' on 'rhel71'
CRS-2677: Stop of 'ora.scan1.vip' on 'rhel71' succeeded
CRS-2672: Attempting to start 'ora.scan1.vip' on 'rhel72'
CRS-2676: Start of 'ora.ons' on 'rhel72' succeeded
CRS-2676: Start of 'ora.scan1.vip' on 'rhel72' succeeded
CRS-2672: Attempting to start 'ora.LISTENER_SCAN1.lsnr' on 'rhel72'
CRS-2676: Start of 'ora.LISTENER_SCAN1.lsnr' on 'rhel72' succeeded
CRS-2676: Start of 'ora.asm' on 'rhel72' succeeded
CRS-2672: Attempting to start 'ora.DATA.dg' on 'rhel72'
CRS-2676: Start of 'ora.DATA.dg' on 'rhel72' succeeded
CRS-6016: Resource auto-start has completed for server rhel72
CRS-6024: Completed start of Oracle Cluster Ready Services-managed resources
CRS-4123: Oracle High Availability Services has been started.
2019/04/09 11:18:29 CLSRSC-343: Successfully started Oracle Clusterware stack
2019/04/09 11:18:29 CLSRSC-594: Executing installation step 19 of 20: 'ConfigNode'.
clscfg: EXISTING configuration version 5 detected.
clscfg: version 5 is 12c Release 2.
Successfully accumulated necessary OCR keys.
Creating OCR keys for user 'root', privgrp 'root'..
Operation successful.
2019/04/09 11:19:15 CLSRSC-594: Executing installation step 20 of 20: 'PostConfig'.
2019/04/09 11:19:28 CLSRSC-325: Configure Oracle Grid Infrastructure for a Cluster ... succeeded


6. Once the GI is cloned and node added, next is to clone the Oracle database software. For this too a gold image of the OH could be used.
7. Unzip the OH gold image on the new node following the same directory structure as existing nodes.
8. Run the clone script to configure and OH. On oracle documentation -noConfig is option is listed as part of the clone command. But on 18c this was not supported.
$ORACLE_HOME/perl/bin/perl clone.pl -silent -O 'CLUSTER_NODES={rhel71,rhel72}' -O LOCAL_NODE=rhel72 ORACLE_BASE=$ORACLE_BASE ORACLE_HOME=$ORACLE_HOME ORACLE_HOME_NAME=OraDB18Home1 -O -noConfig
Starting Oracle Universal Installer...

Checking Temp space: must be greater than 500 MB.   Actual 2595 MB    Passed
Checking swap space: must be greater than 500 MB.   Actual 3006 MB    Passed
Preparing to launch Oracle Universal Installer from /tmp/OraInstall2019-04-09_02-42-13PM. Please wait ...
[INS-04009] The argument [-noconfig] passed is not supported for the current context Clone
Run the clone command without the noConfig and cloning of OH completes without issue.
perl $ORACLE_HOME/clone/bin/clone.pl -silent ORACLE_HOME="/opt/app/oracle/product/18.x.0/dbhome_1"  ORACLE_HOME_NAME="OraDB18Home1" ORACLE_BASE="/opt/app/oracle" "CLUSTER_NODES={rhel71,rhel72}" LOCAL_NODE=rhel72
Starting Oracle Universal Installer...

Checking Temp space: must be greater than 500 MB.   Actual 3918 MB    Passed
Checking swap space: must be greater than 500 MB.   Actual 2974 MB    Passed
Preparing to launch Oracle Universal Installer from /tmp/OraInstall2019-04-09_03-26-55PM. Please wait ...You can find the log of this install session at:
 /opt/app/oraInventory/logs/cloneActions2019-04-09_03-26-55PM.log
..................................................   5% Done.
..................................................   10% Done.
..................................................   15% Done.
..................................................   20% Done.
..................................................   25% Done.
..................................................   30% Done.
..................................................   35% Done.
..................................................   40% Done.
..................................................   45% Done.
..................................................   50% Done.
..................................................   55% Done.
..................................................   60% Done.
..................................................   65% Done.
..................................................   70% Done.
..................................................   75% Done.
..................................................   80% Done.
..................................................   85% Done.
..........
Copy files in progress.

Copy files successful.

Link binaries in progress.
..........
Link binaries successful.

Setup files in progress.
..........
Setup files successful.

Setup Inventory in progress.

Setup Inventory successful.
..........
Finish Setup successful.
The cloning of OraDB18Home1 was successful.
Please check '/opt/app/oraInventory/logs/cloneActions2019-04-09_03-26-55PM.log' for more details.

Setup Oracle Base in progress.

Setup Oracle Base successful.
..................................................   95% Done.

As a root user, execute the following script(s):
        1. /opt/app/oracle/product/18.x.0/dbhome_1/root.sh

Execute /opt/app/oracle/product/18.x.0/dbhome_1/root.sh on the following nodes:
[rhel72]


..................................................   100% Done.

9. Run DBCA from an exiting node and select add instance option.

Thursday, March 7, 2019

Changing ORACLE_BASE, ORACLE_HOME and GI_HOME in a Oracle Restart Setup

This post gives the steps for changing the location of ORACLE_BASE, ORACLE_HOME, oracle Inventory and Grid Infrastructure in a Oracle restart setup. The current and new paths for these items are given in the table below.

ItemCurrent LocationFuture Location
ORACLE_BASE/opt/app/oracle/u01/app/oracle
ORACLE_HOME/opt/app/oracle/product/11.2.0/dbhome_1/u01/app/oracle/product/11.2.0/dbhome_1
GI_HOME/opt/app/oracle/product/12.1.0/grid/u01/app/oracle/product/12.1.0/grid
Oracle Inventory/opt/app/oraInventory/u01/app/oraInventory

As could be seen from the locations the GI home is a 12.1 while the DB runs out of a 11.2 (11.2.0.4) home.

1. It is assumed the mount point /u01 exists. Create the two base directories first, that is the Oracle base and oracle inventory directories and set the necessary permissions.
# cd /u01/

# mkdir -p app/oracle
# mkdir -p app/oraInventory

# chmod 775 oracle
# chmod 770 oraInventory

# chown oracle:oinstall oracle
# chown grid:oinstall oraInventory
2. Stop the database and the HA service.
srvctl stop database -d westdb
crsctl stop has
3. Detach the current GI home from the inventory.
[grid@west bin]$ ./runInstaller -silent -waitforcompletion -detachHome ORACLE_HOME='/opt/app/oracle/product/12.1.0/grid'
Starting Oracle Universal Installer...

Checking swap space: must be greater than 500 MB.   Actual 4097 MB    Passed
The inventory pointer is located at /etc/oraInst.loc
'DetachHome' was successful.
Check the GI home was removed from the inventory by checking in the inventory.xml
<HOME NAME="OraGI12Home1" LOC="/opt/app/oracle/product/12.1.0/grid" TYPE="O" IDX="1" REMOVED="T"/>
4. Create the future GI Home location.
mkdir -p /u01/app/oracle/product/12.1.0/
Copy the current grid folder to the future location.
cd /opt/app/oracle/product/12.1.0
cp -pR grid /u01/app/oracle/product/12.1.0/
5. Clone the GI Home in the new location. Pass the new Oracle base, GI home and oracle inventory locations to the clone script.
cd /u01/app/oracle/product/12.1.0/grid/clone/bin
$ perl clone.pl -silent ORACLE_BASE=/u01/app/oracle ORACLE_HOME=/u01/app/oracle/product/12.1.0/grid 
ORACLE_HOME_NAME=OraGI12Home1 INVENTORY_LOCATION=/u01/app/oraInventory CRS=true

./runInstaller -clone -waitForCompletion  "ORACLE_BASE=/u01/app/oracle" "ORACLE_HOME=/u01/app/oracle/product/12.1.0/grid" "ORACLE_HOME_NAME=OraGI12Home1" "INVENTORY_LOCATION=/u01/app/oraInventory" -silent -paramFile /u01/app/oracle/product/12.1.0/grid/clone/clone_oraparam.ini
Starting Oracle Universal Installer...

Checking Temp space: must be greater than 500 MB.   Actual 17853 MB    Passed
Checking swap space: must be greater than 500 MB.   Actual 4097 MB    Passed
Preparing to launch Oracle Universal Installer from /tmp/OraInstall2019-03-07_06-42-57PM. Please wait ...You can find the log of this install session at:
 /u01/app/oraInventory/logs/cloneActions2019-03-07_06-42-57PM.log
..................................................   5% Done.
..................................................   10% Done.
..................................................   15% Done.
..................................................   20% Done.
..................................................   25% Done.
..................................................   30% Done.
..................................................   35% Done.
..................................................   40% Done.
..................................................   45% Done.
..................................................   50% Done.
..................................................   55% Done.
..................................................   60% Done.
..................................................   65% Done.
..................................................   70% Done.
..................................................   75% Done.
..................................................   80% Done.
..................................................   85% Done.
..........Could not backup file /u01/app/oracle/product/12.1.0/grid/root.sh to /u01/app/oracle/product/12.1.0/grid/root.sh.ouibak
Could not backup file /u01/app/oracle/product/12.1.0/grid/rootupgrade.sh to /u01/app/oracle/product/12.1.0/grid/rootupgrade.sh.ouibak

Copy files in progress.

Copy files successful.

Link binaries in progress.

Link binaries successful.

Setup files in progress.

Setup files successful.

Setup Inventory in progress.

Setup Inventory successful.

Finish Setup successful.
The cloning of OraGI12Home1 was successful.
Please check '/u01/app/oraInventory/logs/cloneActions2019-03-07_06-42-57PM.log' for more details.

Setup Oracle Base in progress.

Setup Oracle Base successful.
..................................................   95% Done.

As a root user, execute the following script(s):
        1. /u01/app/oraInventory/orainstRoot.sh
        2. /u01/app/oracle/product/12.1.0/grid/root.sh


..................................................   100% Done.
You have new mail in /var/spool/mail/grid
6. After running the orainstRoot.sh the inventory location gets updated in the /etc/oraInst.loc
/u01/app/oraInventory/orainstRoot.sh

cat /etc/oraInst.loc
inventory_loc=/u01/app/oraInventory
inst_group=oinstall
7. Running the root.sh will generate a log file which will have commands to run to create a Oracle restart setup or a cluster setup.
Check /u01/app/oracle/product/12.1.0/grid/install/root_west.domain.net_2019-03-07_18-45-23.log for the output of root script

# tail -f /u01/app/oracle/product/12.1.0/grid/install/root_west.domain.net_2019-03-07_18-45-23.log
Now product-specific root actions will be performed.

To configure Grid Infrastructure for a Stand-Alone Server run the following command as the root user:
/u01/app/oracle/product/12.1.0/grid/perl/bin/perl -I/u01/app/oracle/product/12.1.0/grid/perl/lib -I/u01/app/oracle/product/12.1.0/grid/crs/install /u01/app/oracle/product/12.1.0/grid/crs/install/roothas.pl
8. Before running the command mentioned in the log file, the existing Oracle restart configuration need to be de-configured. If not following error will occur.
Using configuration parameter file: /u01/app/oracle/product/12.1.0/grid/crs/install/crsconfig_params
2019/03/07 18:46:12 CLSRSC-350: Cannot configure two CRS instances on the same cluster

2019/03/07 18:46:14 CLSRSC-352: CRS is already configured on this node for the CRS home location /opt/app/oracle/product/12.1.0/grid
To de-configure run the following command.
# /u01/app/oracle/product/12.1.0/grid/perl/bin/perl roothas.pl -deconfig -force
Using configuration parameter file: ./crsconfig_params
2019/03/07 18:47:50 CLSRSC-337: Successfully deconfigured Oracle Restart stack
9. Run the command to create the Oracle restart setup.
# /u01/app/oracle/product/12.1.0/grid/perl/bin/perl -I/u01/app/oracle/product/12.1.0/grid/perl/lib -I/u01/app/oracle/product/12.1.0/grid/crs/install /u01/app/oracle/product/12.1.0/grid/crs/install/roothas.pl
Using configuration parameter file: /u01/app/oracle/product/12.1.0/grid/crs/install/crsconfig_params
LOCAL ADD MODE
Creating OCR keys for user 'grid', privgrp 'oinstall'..
Operation successful.
LOCAL ONLY MODE
Successfully accumulated necessary OCR keys.
Creating OCR keys for user 'root', privgrp 'root'..
Operation successful.
CRS-4664: Node west successfully pinned.
2019/03/07 18:48:26 CLSRSC-330: Adding Clusterware entries to file 'oracle-ohasd.service'

west     2019/03/07 13:18:58     /u01/app/oracle/product/12.1.0/grid/cdata/west/backup_20190307_131858.olr     459864538
CRS-2791: Starting shutdown of Oracle High Availability Services-managed resources on 'west'
CRS-2673: Attempting to stop 'ora.evmd' on 'west'
CRS-2677: Stop of 'ora.evmd' on 'west' succeeded
CRS-2793: Shutdown of Oracle High Availability Services-managed resources on 'west' has completed
CRS-4133: Oracle High Availability Services has been stopped.
CRS-4123: Oracle High Availability Services has been started.
2019/03/07 18:50:11 CLSRSC-327: Successfully configured Oracle Restart for a standalone server
10. Check the GI home added to inventory in new inventory location.
<HOME NAME="OraGI12Home1" LOC="/u01/app/oracle/product/12.1.0/grid" TYPE="O" IDX="1" CRS="true"/>
11. Add listener and ASM to the Oracle restart config.
srvctl add listener -l listener -o /u01/app/oracle/product/12.1.0/grid -p 1521
srvctl start listener -l listener
srvctl add asm -l listener -p +data/asm/ASMPARAMETERFILE/REGISTRY.253.881942589 -d "/dev/sd*"
srvctl start asm

 crsctl stat res -t
--------------------------------------------------------------------------------
Name           Target  State        Server                   State details
--------------------------------------------------------------------------------
Local Resources
--------------------------------------------------------------------------------
ora.DATA.dg
               ONLINE  ONLINE       west                     STABLE
ora.FLASH.dg
               ONLINE  ONLINE       west                     STABLE
ora.LISTENER.lsnr
               ONLINE  ONLINE       west                     STABLE
ora.asm
               ONLINE  ONLINE       west                     Started,STABLE
ora.ons
               OFFLINE OFFLINE      west                     STABLE
--------------------------------------------------------------------------------
Cluster Resources
--------------------------------------------------------------------------------
ora.cssd
      1        ONLINE  ONLINE       west                     STABLE
ora.diskmon
      1        OFFLINE OFFLINE                               STABLE
ora.evmd
      1        ONLINE  ONLINE       west                     STABLE
--------------------------------------------------------------------------------


12. Next step is to move the Oracle home to new location. As this is a role separated setup, write permission must be granted to oracle user for admin and diag directories inside Oracle base.
cd $ORACLE_BASE
chmod 775 admin diag
Create the new Oracle home location and copy the current Oracle home (dbhome_1) to new location.
# cd /u01/app/oracle/product
# mkdir -p 11.2.0

# cd /opt/app/oracle/product/11.2.0
# cp -pR dbhome_1 /u01/app/oracle/product/11.2.0/
13. Clone the DB Home
$ cd /u01/app/oracle/product/11.2.0/dbhome_1/clone/

/u01/app/oracle/product/11.2.0/dbhome_1/perl/bin/perl clone.pl ORACLE_BASE="/u01/app/oracle/" ORACLE_HOME="/u01/app/oracle/product/11.2.0/dbhome_1" OSDBA_GROUP=dba OSOPER_GROUP=oper -defaultHomeName

./runInstaller -clone -waitForCompletion  "ORACLE_BASE=/u01/app/oracle/" "ORACLE_HOME=/u01/app/oracle/product/11.2.0/dbhome_1" "oracle_install_OSDBA=dba" "oracle_install_OSOPER=oper" -defaultHomeName  -defaultHomeName "CRS=true" -silent -noConfig -nowait
Starting Oracle Universal Installer...

Checking swap space: must be greater than 500 MB.   Actual 4097 MB    Passed
Preparing to launch Oracle Universal Installer from /tmp/OraInstall2019-03-07_07-21-14PM. Please wait ...Oracle Universal Installer, Version 11.2.0.4.0 Production
Copyright (C) 1999, 2013, Oracle. All rights reserved.

You can find the log of this install session at:
 /u01/app/oraInventory/logs/cloneActions2019-03-07_07-21-14PM.log
.................................................................................................... 100% Done.

Installation in progress (Thursday, 7 March 2019 19:21:31 o'clock IST)
...........................................................................                                                     75% Done.
Install successful

Linking in progress (Thursday, 7 March 2019 19:21:43 o'clock IST)
Link successful

Setup in progress (Thursday, 7 March 2019 19:22:43 o'clock IST)
Setup successful

End of install phases.(Thursday, 7 March 2019 19:23:08 o'clock IST)
WARNING:
The following configuration scripts need to be executed as the "root" user.
/u01/app/oracle/product/11.2.0/dbhome_1/root.sh
To execute the configuration scripts:
    1. Open a terminal window
    2. Log in as "root"
    3. Run the scripts

The cloning of OraHome1 was successful.
Please check '/u01/app/oraInventory/logs/cloneActions2019-03-07_07-21-14PM.log' for more details.
Check the inventory is updated with new DB home location.
<HOME NAME="OraDb11g_home1" LOC="/u01/app/oracle/product/11.2.0/dbhome_1" TYPE="O" IDX="2"/>
14. Update the /etc/oratab with the new Oracle home location. Add the database to the Oracle restart configuration.
srvctl add database -d westdb -o /u01/app/oracle/product/11.2.0/dbhome_1 -p +DATA/westdb/spfilewestdb.ora -a "data,flash"
srvctl start database -d westdb
Certain init parameters will refer to paths under previous Oracle base. Change them to reflect the current Oracle base.
show parameter diagnostic_dest
diagnostic_dest                      string      /opt/app/oracle

alter system set diagnostic_dest='/u01/app/oracle' scope=both;
alter system set audit_file_dest='/u01/app/oracle/admin/westdb/adump' scope=spfile;

mkdir -p u01/app/oracle/admin/westdb/adump
15. Stop the database and the Oracle restart stack. Rename the old base location (/opt/app/) to something temporary (/opt/appx/) and start the database. If all steps are followed there shouldn't be any references to previous location. Current oracle base directory could also be found out with orabase.
$ orabase
/u01/app/oracle
Once certain no references to old locations remain those could be removed.

Thursday, June 14, 2018

Remote Cloning a PDB with Encrypted Data

This post list the steps for remote cloning a PDB that has encrypted data. What's difference in this case, to that of a remote cloning a PDB without the use of 12c TDE is the use of the encryption key. The master key of the source PDB must be available to cloned PDB. There are multiple ways of achieving this. This post shows two convenient ways to use when remote cloning PDBs with encrypted data.

Update 2018/07/24 : Method 1 shown below doesn't work on Oracle cloud where TDE is enabled by default. This is due to bug 24763954 which is closed as not a bug. If remote cloning is done on Oracle cloud then use the method two mention in the post. For more refer MOS notes 2228673.1, 2208792.1, 2415131.1.

Method 1. Using one_step_plugin_for_pdb_with_tde parameter
According to advance security guide "when ONE_STEP_PLUGIN_FOR_PDB_WITH_TDE is set to TRUE, the database caches the keystore password in memory, obfuscated at the system level, and then uses it for the import operation. The default for ONE_STEP_PLUGIN_FOR_PDB_WITH_TDE is FALSE".
So in order to clone a PDB with encrypted data simply set the ONE_STEP_PLUGIN_FOR_PDB_WITH_TDE to true and run the cloning operation.

1. The remote PDB has a encrypted tablespace
SQL> select tablespace_name,encrypted from dba_tablespaces where encrypted='YES' ;

TABLESPACE_NAME                ENC
------------------------------ ---
ENCTEST                        YES

SQL> select t.name,ENCRYPTIONALG,STATUS FROM V$ENCRYPTED_TABLESPACES  e, v$tablespace t where e.ts#=t.ts#;

NAME       ENCRYPT STATUS
---------- ------- ----------
ENCTEST    AES128  NORMAL
2. Create a key store (encryption wallet) at the CDB root where the clone will be created. Without this the cloning will fail. Creating wallet is shown in a previous post.

3. Set the ONE_STEP_PLUGIN_FOR_PDB_WITH_TDE to true
ALTER SYSTEM SET one_step_plugin_for_pdb_with_tde=TRUE SCOPE=BOTH;
4. Run the remote clone operation. Steps for remote cloning is available in a previous post.
create pluggable database mypdb from cxpdb@PDB1K_LINK 
file_name_convert=('/opt/oracle/oradata/cxcdb/cxpdb/','/opt/oracle/oradata/oracdb/mypdb/') ;

Pluggable database created.
5. Finally open the cloned PDB.
SQL> show pdbs

    CON_ID CON_NAME                       OPEN MODE  RESTRICTED
---------- ------------------------------ ---------- ----------
         2 PDB$SEED                       READ ONLY  NO
         3 ORAPDB                         READ WRITE NO
         4 MYPDB                          MOUNTED


SQL> alter pluggable database mypdb open;

Pluggable database altered.


SQL> show pdbs

    CON_ID CON_NAME                       OPEN MODE  RESTRICTED
---------- ------------------------------ ---------- ----------
         2 PDB$SEED                       READ ONLY  NO
         3 ORAPDB                         READ WRITE NO
         4 MYPDB                          READ WRITE NO
6. If no longer used then set the ONE_STEP_PLUGIN_FOR_PDB_WITH_TDE to default value of false.
ALTER SYSTEM SET one_step_plugin_for_pdb_with_tde=FALSE SCOPE=BOTH;


Method 2. Using Key Store Password of the Local CDB
In this method the key store password of the local CDB (CDB where the clone PDB is created) is used during the clone command. As per security guide the encrypted data is still accessible because during the cloning the master key of the remote PDB is copied over. However it's best to re-key after the cloning as the original key information is not shown in the PDB's v$ views.

1. The same remote PDB is used for this example as well. It's also assumed the local CDB has wallet already created.

2. Execute the remote cloning command on the CDB root specifying the key store password.
create pluggable database mypdb from cxpdb@PDB1K_LINK 
file_name_convert=('/opt/oracle/oradata/cxcdb/cxpdb/','/opt/oracle/oradata/oracdb/mypdb/') 
KEYSTORE IDENTIFIED BY  asanga123;

Pluggable database created.
3. Open the PDB and check the encryption key on the clone PDB's v$view. As mentioned in the security guide this return no rows.
SQL> show pdbs

    CON_ID CON_NAME                       OPEN MODE  RESTRICTED
---------- ------------------------------ ---------- ----------
         2 PDB$SEED                       READ ONLY  NO
         3 ORAPDB                         READ WRITE NO
         5 MYPDB                          READ WRITE NO

SQL> alter session set container=mypdb;

Session altered.

SQL> select CON_ID,KEY_ID,KEYSTORE_TYPE,CREATOR_DBNAME,CREATOR_PDBNAME from v$encryption_keys order by 1;

no rows selected
4. Run the below to re-key. The force option is used due to bug 22826718. Refer 1944507.1 for more.
ADMINISTER KEY MANAGEMENT SET KEY FORCE KEYSTORE IDENTIFIED BY asanga123 with backup;
 
 SQL> select CON_ID,KEY_ID,KEYSTORE_TYPE,CREATOR_DBNAME,CREATOR_PDBNAME from v$encryption_keys order by 1;

    CON_ID KEY_ID                                                  KEYSTORE_TYPE     CREATOR_DB CREATOR_PD
---------- ------------------------------------------------------- ----------------- ---------- ----------
         5 AXj5300QAE8Kv7cOn6U0xJ8AAAAAAAAAAAAAAAAAAAAAAAAAAAAA    SOFTWARE KEYSTORE oracdb     MYPDB

Sunday, September 18, 2016

Remote Cloning of a PDB

Similar to non-CDB, PDB too could cloned over a remote link. In this case both source and remote DBs are CDBs and one PDB is cloned on the local DB. As the first step create a TNS entry and a link on the local DB. The remote PDB is called PDB1K
PDB1KTNS =
  (DESCRIPTION =
    (ADDRESS = (PROTOCOL = TCP)(HOST = 192.168.0.88)(PORT = 1521))
    (CONNECT_DATA =
      (SERVER = DEDICATED)
      (SERVICE_NAME = pdb1k)
    )
  )

SQL> create database link pdb1k_link connect to  system identified by system using 'PDB1KTNS';
Validate the link by querying a view on the remote PDB
SQL> select name from v$pdbs@pdb1k_link;

NAME
------------------------------
PDB1K
If OMF is used nothing else is needed and PDB could be cloned. However in this case a data files of the remotely cloned PDBs are stored separately. To achieve that set the db_create_dest parameter to desired location with scope set to memory.
SQL> alter system set db_create_file_dest='/opt/app/oracle/oradata/remoteclones' scope=memory;

SQL> show parameter db_create

NAME                                 TYPE        VALUE
------------------------------------ ----------- ------------------------------
db_create_file_dest                  string      /opt/app/oracle/oradata/remoteclones


Put the source PDB into read only mode. Refer oracle doc for full list of pre-reqs. Create the PDB, the new PDB is named PDB1KRMT.
SQL> create pluggable database pdb1krmt from pdb1k@pdb1k_link;

SQL> show pdbs

    CON_ID CON_NAME                       OPEN MODE  RESTRICTED
---------- ------------------------------ ---------- ----------
         2 PDB$SEED                       READ ONLY  NO
         3 ONEPDB                         READ WRITE NO
         4 TWOPDB                         READ WRITE NO
         5 PDB1KRMT                       MOUNTED
Finally open the PDB
SQL> alter pluggable database pdb1krmt open;

SQL> show pdbs;

    CON_ID CON_NAME                       OPEN MODE  RESTRICTED
---------- ------------------------------ ---------- ----------
         2 PDB$SEED                       READ ONLY  NO
         3 ONEPDB                         READ WRITE NO
         4 TWOPDB                         READ WRITE NO
         5 PDB1KRMT                       READ WRITE NO
Verify the PDB data files are created in the intended location
SQL>  select name from v$datafile;

NAME
------------------------------------------------------------------------------------------------------------------------
/opt/app/oracle/oradata/CGCDB/datafile/o1_mf_undotbs1_cvchzywd_.dbf
/opt/app/oracle/oradata/remoteclones/CGCDB/3B5F12ED0B6F4762E0536300A8C0A85F/datafile/o1_mf_system_cwfq6dd5_.dbf
/opt/app/oracle/oradata/remoteclones/CGCDB/3B5F12ED0B6F4762E0536300A8C0A85F/datafile/o1_mf_sysaux_cwfq6ddt_.dbf
/opt/app/oracle/oradata/remoteclones/CGCDB/3B5F12ED0B6F4762E0536300A8C0A85F/datafile/o1_mf_pdb1ktbs_cwfq6ddv_.dbf
Using the USER_TABLESPACES clause available on 12.1.0.2 it is possible to clone the new PDB only with a subset of tablespaces. Assume that original PDB has 3 application specific tablespaces.
SQL> select tablespace_name,status from dba_tablespaces;

TABLESPACE_NAME                STATUS
------------------------------ ---------
SYSTEM                         ONLINE
SYSAUX                         ONLINE
TEMP                           ONLINE
APP1                           ONLINE
APP2                           ONLINE
APP3                           ONLINE
Only 2 of them are wanted in the newly cloned PDB. It is possible to include just these two tablespaces in the user_tablespaces clause excluding all other tablespaces.
create pluggable database pdb1krmt from pdb1k@pdb1k_link USER_TABLESPACES=('APP1','APP3');
Tablespace name exists but status will be offline with data file missing as well.
SQL> select tablespace_name,status from dba_tablespaces;

TABLESPACE_NAME                STATUS
------------------------------ ---------
SYSTEM                         ONLINE
SYSAUX                         ONLINE
TEMP                           ONLINE
APP1                           ONLINE
APP2                           OFFLINE
APP3                           ONLINE

SQL> select tablespace_name,status,file_name from dba_data_files;

TABLESPACE_NAME                STATUS    FILE_NAME
------------------------------ --------- ----------------------------------------------------------------------------------------------------
SYSTEM                         AVAILABLE /opt/app/oracle/oradata/CGCDB/3BED1E0F3E63672CE0536300A8C0356F/datafile/o1_mf_system_cx0bpkwo_.dbf
SYSAUX                         AVAILABLE /opt/app/oracle/oradata/CGCDB/3BED1E0F3E63672CE0536300A8C0356F/datafile/o1_mf_sysaux_cx0bpkwy_.dbf
APP1                           AVAILABLE /opt/app/oracle/oradata/CGCDB/3BED1E0F3E63672CE0536300A8C0356F/datafile/o1_mf_app1_cx0bpkwz_.dbf
APP3                           AVAILABLE /opt/app/oracle/oradata/CGCDB/3BED1E0F3E63672CE0536300A8C0356F/datafile/o1_mf_app3_cx0bpkx1_.dbf
APP2                           AVAILABLE /opt/app/oracle/product/12.1.0/dbhome_2/dbs/MISSING00122
Offline tablespace could be dropped to clean up the new PDB
SQL> drop tablespace app2 including contents and datafiles cascade constraints;
Same could be done when plugging non-CDB as PDBs as well.
SQL> create pluggable database stdpdb from std12c1@std_link USER_TABLESPACES=('APP1','APP3');
Run the post cloning steps and verify the tablespace list
SQL> select tablespace_name,status from dba_tablespaces order by 2,1;

TABLESPACE_NAME                STATUS
------------------------------ ---------
APP2                           OFFLINE
TOOLS                          OFFLINE
UNDOTBS1                       OFFLINE
USERS                          OFFLINE
APP1                           ONLINE
APP3                           ONLINE
SYSAUX                         ONLINE
SYSTEM                         ONLINE
TEMP                           ONLINE

SQL> select tablespace_name,status,file_name from dba_data_files;

TABLESPACE_NAME                STATUS    FILE_NAME
------------------------------ --------- ----------------------------------------------------------------------------------------------------
SYSTEM                         AVAILABLE /opt/app/oracle/oradata/CGCDB/3BEC00E8AA7862ECE0536300A8C0B5F7/datafile/o1_mf_system_cx060v17_.dbf
SYSAUX                         AVAILABLE /opt/app/oracle/oradata/CGCDB/3BEC00E8AA7862ECE0536300A8C0B5F7/datafile/o1_mf_sysaux_cx060v18_.dbf
USERS                          AVAILABLE /opt/app/oracle/product/12.1.0/dbhome_2/dbs/MISSING00114
TOOLS                          AVAILABLE /opt/app/oracle/product/12.1.0/dbhome_2/dbs/MISSING00115
APP1                           AVAILABLE /opt/app/oracle/oradata/CGCDB/3BEC00E8AA7862ECE0536300A8C0B5F7/datafile/o1_mf_app1_cx060v1b_.dbf
APP2                           AVAILABLE /opt/app/oracle/product/12.1.0/dbhome_2/dbs/MISSING00117
APP3                           AVAILABLE /opt/app/oracle/oradata/CGCDB/3BEC00E8AA7862ECE0536300A8C0B5F7/datafile/o1_mf_app3_cx060v1c_.dbf
Undo tablespace within the PDB cannot be removed (2067414.1).
SQL> drop tablespace UNDOTBS1 including contents and datafiles cascade constraints;
drop tablespace UNDOTBS1 including contents and datafiles cascade constraints
*
ERROR at line 1:
ORA-30013: undo tablespace 'UNDOTBS1' is currently in use
Offline undo tablespace in this case is the undo tablespace on non-CDB. This is because the CDB undo tablespace name and cloned non-CDB tablespace name is the same and undo is not local to PDB but common to entire CDB. It was not possible to get rid of the undotbs1 offline status even after switching the default undo tablespace of the CDB to a different undo tablespace.
This clause does not apply to the SYSTEM, SYSAUX, or TEMP tablespaces.

Related Posts
Move a PDB Between Servers
Plugging a SE2 non-CDB as an EE PDB Using File Copying and Remote Link

Friday, September 10, 2010

Cloning Oracle Homes

Oracle Homes could be cloned with either $ORACLE_HOME/clone/bin/clone.pl or $ORACLE_HOME/oui/bin/runInstaller.

Using clone.pl

1. Run prepare_clone.pl on the source oracle home before it's copied to destination and tar the source oracle home and copy to destination.

2. Extract the oracle home at the destination server.

3. set ORACLE_BASE and ORACLE_HOME variables (not necessary) and run the clone.pl
perl clone.pl ORACLE_HOME=/opt/app/oracle/product/10.2.0/ent ORACLE_HOME_NAME=10ghome
./runInstaller -silent -clone -waitForCompletion  "ORACLE_HOME=/opt/app/oracle/product/10.2.0/ent" "ORACLE_HOME_NAME=10ghome" -noConfig -nowait
Starting Oracle Universal Installer...

No pre-requisite checks found in oraparam.ini, no system pre-requisite checks will be executed.
Preparing to launch Oracle Universal Installer from /tmp/OraInstall2010-09-10_10-41-16AM. Please wait ...Oracle Universal Installer, Version 10.2.0.5.0 Production
Copyright (C) 1999, 2010, Oracle. All rights reserved.

SEVERE:1. OUI-10035:You do not have permission to write to the inventory location.
OR
2. OUI-10033:The inventory location /opt/app/oraInventory set by the previous installation session is no longer accessible. Do you still want to continue by creating a new inventory? Note that you may lose the products installed in the earlier session.
SEVERE:OUI-10180:Either a component of the path prefix or the file referred to by path does not exist or is a null pathname.
As shown in the inventory creation post when oracle base is set the inventory location deviate from default 10g inventory position. To fix the problem oraInventory directory could be pre-created or ORACLE_BASE could be unset, in the second case oraInventory will be created in /home/oracle.

3. After fixing the issue with oraInventory run the command again
unset ORACLE_BASE
unset ORACLE_HOME
perl clone.pl ORACLE_HOME=/opt/app/oracle/product/10.2.0/ent ORACLE_HOME_NAME=10ghome
./runInstaller -silent -clone -waitForCompletion  "ORACLE_HOME=/opt/app/oracle/product/10.2.0/ent" "ORACLE_HOME_NAME=10ghome" -noConfig -nowait
Starting Oracle Universal Installer...

No pre-requisite checks found in oraparam.ini, no system pre-requisite checks will be executed.
Preparing to launch Oracle Universal Installer from /tmp/OraInstall2010-09-10_10-43-12AM. Please wait ...Oracle Universal Installer, Version 10.2.0.5.0 Production
Copyright (C) 1999, 2010, Oracle. All rights reserved.

You can find a log of this install session at:
/home/oracle/oraInventory/logs/cloneActions2010-09-10_10-43-12AM.log
.................................................................................................... 100% Done.

Installation in progress (Friday, September 10, 2010 10:43:28 AM BST)
...........................................................................                                                     75% Done.
Install successful

Linking in progress (Friday, September 10, 2010 10:43:39 AM BST)
Link successful

Setup in progress (Friday, September 10, 2010 10:44:17 AM BST)
Setup successful

End of install phases.(Friday, September 10, 2010 10:44:21 AM BST)
WARNING:A new inventory has been created in this session. However, it has not yet been registered as the central inventory of this system.
To register the new inventory please run the script '/home/oracle/oraInventory/orainstRoot.sh' with root privileges.
If you do not register the inventory, you may not be able to update or patch the products you installed.
The following configuration scripts need to be executed as the "root" user.
#!/bin/sh
#Root script to run
/home/oracle/oraInventory/orainstRoot.sh
/opt/app/oracle/product/10.2.0/ent/root.sh
To execute the configuration scripts:
1. Open a terminal window
2. Log in as "root"
3. Run the scripts

The cloning of 10ghome was successful.
Please check '/home/oracle/oraInventory/logs/cloneActions2010-09-10_10-43-12AM.log' for more details.
oraInst.loc would have been created inside oraInventory (this is linux x86_64) instead of in /etc


Using runInstaller

1. Step 1,2 are same as above.

2. Run the runInstaller command from $ORACLE_HOME/oui/bin
./runInstaller -silent -clone ORACLE_HOME=/opt/app/oracle/product/10.2.0/ent ORACLE_HOME_NAME="10g2home1"
Starting Oracle Universal Installer...

No pre-requisite checks found in oraparam.ini, no system pre-requisite checks will be executed.
Preparing to launch Oracle Universal Installer from /tmp/OraInstall2010-09-10_11-49-48AM. Please wait ...
Oracle Universal Installer, Version 10.2.0.5.0 Production
Copyright (C) 1999, 2010, Oracle. All rights reserved.

You can find a log of this install session at:
/home/oracle/oraInventory/logs/cloneActions2010-09-10_11-49-48AM.log
.................................................................................................... 100% Done.

Installation in progress (Friday, September 10, 2010 11:50:05 AM BST)
...........................................................................                                                     75% Done.
Install successful

Linking in progress (Friday, September 10, 2010 11:50:15 AM BST)
Link successful

Setup in progress (Friday, September 10, 2010 11:50:55 AM BST)
Setup successful

End of install phases.(Friday, September 10, 2010 11:50:59 AM BST)
WARNING:A new inventory has been created in this session. However, it has not yet been registered as the central inventory of this system.
To register the new inventory please run the script '/home/oracle/oraInventory/orainstRoot.sh' with root privileges.
If you do not register the inventory, you may not be able to update or patch the products you installed.
The following configuration scripts need to be executed as the "root" user.
#!/bin/sh
#Root script to run
/home/oracle/oraInventory/orainstRoot.sh
/opt/app/oracle/product/10.2.0/ent/root.sh
To execute the configuration scripts:
1. Open a terminal window
2. Log in as "root"
3. Run the scripts

The cloning of 10g2home1 was successful.
Please check '/home/oracle/oraInventory/logs/cloneActions2010-09-10_11-49-48AM.log' for more details.
Same as before oraInst.loc is inside oraInventory not in /etc.

On 11gR1 and 11gR2 ORACLE_BASE must also be specified in the command line if not cloning will fail.
./runInstaller -silent -clone ORACLE_HOME=/opt/app/oracle/product/11.2.0/ent ORACLE_HOME_NAME="11g2home1"
Starting Oracle Universal Installer...

Checking swap space: must be greater than 500 MB.   Actual 16002 MB    Passed
Preparing to launch Oracle Universal Installer from /tmp/OraInstall2010-09-10_11-07-10AM. Please wait ...
Oracle Universal Installer, Version 11.2.0.1.0 Production
Copyright (C) 1999, 2009, Oracle. All rights reserved.

You can find the log of this install session at:
/home/oracle/oraInventory/logs/cloneActions2010-09-10_11-07-10AM.log
Values for the following variables could not be obtained from the command line or response file(s):
ORACLE_BASE
Cloning cannot continue.
This is same even if clone.pl was used
perl clone.pl ORACLE_HOME=/opt/app/oracle/product/11.2.0/ent ORACLE_HOME_NAME="11g2home1"
ERROR: Invalid Oracle Base specified. Aborting the clone operation. 
Once oracle base is specified cloning will suceed.
./runInstaller -silent -clone ORACLE_HOME=/opt/app/oracle/product/11.2.0/ent ORACLE_HOME_NAME="11g2home1" ORACLE_BASE=/opt/app/oracle
Starting Oracle Universal Installer...

Checking swap space: must be greater than 500 MB.   Actual 16002 MB    Passed
Preparing to launch Oracle Universal Installer from /tmp/OraInstall2010-09-10_12-12-04PM. Please wait ...
Oracle Universal Installer, Version 11.2.0.1.0 Production
Copyright (C) 1999, 2009, Oracle. All rights reserved.

You can find the log of this install session at:
/home/oracle/oraInventory/logs/cloneActions2010-09-10_12-12-04PM.log
.................................................................................................... 100% Done.

Installation in progress (Friday, September 10, 2010 12:12:14 PM BST)
.............................................................................                                                   77% Done.
Install successful

Linking in progress (Friday, September 10, 2010 12:12:20 PM BST)
Link successful

Setup in progress (Friday, September 10, 2010 12:12:51 PM BST)
Setup successful

End of install phases.(Friday, September 10, 2010 12:13:38 PM BST)
Starting to execute configuration assistants
Configuration assistant "Oracle Configuration Manager Clone" succeeded
WARNING:A new inventory has been created in this session. However, it has not yet been registered as the central inventory of this system.
To register the new inventory please run the script '/home/oracle/oraInventory/orainstRoot.sh' with root privileges.
If you do not register the inventory, you may not be able to update or patch the products you installed.
The following configuration scripts need to be executed as the "root" user.
/home/oracle/oraInventory/orainstRoot.sh
/opt/app/oracle/product/11.2.0/ent/root.sh
To execute the configuration scripts:
1. Open a terminal window
2. Log in as "root"
3. Run the scripts

The cloning of 11g2home1 was successful.
Please check '/home/oracle/oraInventory/logs/cloneActions2010-09-10_12-12-04PM.log' for more details.


Wednesday, April 28, 2010

Cloning/Duplicating controlfile between ASM diskgroups

Assume the following situation where there's only one controlfile for the whole DB.
SQL> show parameter control

NAME TYPE VALUE
------------- ------- ------------------------------
control_files string +FLASH/rac11g/controlfile/current.263.714060123

For obvious reasons it's not a good idea to run a DB with just one controlfile. To clone/duplicate the current controlfile to another diskgroup use the following steps.
Edit the spfile by specifying the new location of the controlfile
SQL> alter system set control_files='+FLASH/rac11g/controlfile/current.263.714060123',
'+DATA' scope=spfile sid='*';

Shutdown cleanly
SQL> shutdown immediate;
and
SQL> startup nomount
Use RMAN to restore the current controlfile to new location
RMAN> restore controlfile from '+FLASH/rac11g/controlfile/current.263.714060123';

Starting restore at 29-Apr-2010 00:32:33
using target database control file instead of recovery catalog
allocated channel: ORA_DISK_1
channel ORA_DISK_1: SID=141 instance=rac11g1 device type=DISK

channel ORA_DISK_1: copied control file copy
output file name=+FLASH/rac11g/controlfile/current.263.714060123
output file name=+DATA/rac11g/controlfile/current.393.717553955
Finished restore at 29-Apr-2010 00:32:38
Start the DB and view spfile has the full location of the new controlfile
SQL> alter database mount;
SQL> show parameter control
NAME TYPE VALUE
------------- ------ ------------------------------
control_files string +FLASH/rac11g/controlfile/current.263.714060123,
+DATA/rac11g/controlfile/current.393.717553955
SQL> alter database open;


Thursday, April 10, 2008

Move and Rename DB

1. Backup the control file of DB to trace.
alter database backup controlfile to trace

This will produce the following sql in user_dump_dest

STARTUP NOMOUNT
CREATE CONTROLFILE REUSE DATABASE "OLDDB" NORESETLOGS

2. Shutdown the DB and move the datafiles to the new location. DataFiles can be renamed but control file trace must be edited to reflect the changes.
3. Change
CREATE CONTROLFILE REUSE DATABASE "OLDDB" NORESETLOGS
to
CREATE CONTROLFILE SET DATABASE "NEWDB" NORESETLOGS

4. Remove recover database and open database statments from the control file trace.
5. If any of the *dump directories are missing create them.
6. create a pfile to start the new DB
7. Start the new DB with
startup nomount;
@control_file_trace.sql


Monday, February 18, 2008

Clone new Cluster Node

Cloning Oracle Clusterware

  1. Archive the Oracle Clusterware home from node A (existing node) and copy it to node B and node C. (node B and C are new nodes) ($CRS_HOME)
  2. Unarchive the home on the new nodes B and C. In case of shared home, unarchive the home only once on either of the nodes.
  3. On nodes B and C go to $CRS_HOME/clone/bin and execute the following command:
  4. perl clone.pl ORACLE_HOME=Path to the Oracle_Home being cloned
    ORACLE_HOME_NAME=Oracle_Home_Name for the Oracle_Home being cloned
    '-On_storageTypeVDSK=2' '-On_storageTypeOCR=2'
    '-O"sl_tableList={node_B:node_B_priv:node_B-vip,
    ode_C:node_C_priv:node_C-vip}"' '-OINVENTORY_LOCATION=inventory location'
  5. On UNIX, navigate to the directory and run orainstRoot.sh on the nodes B and C. This populates /etc/oraInst.loc with the location of the Central Inventory. On nodes B and C, go to $CRS_HOME and run root.sh. This will bring the Oracle Clusterware stack on node B. Repeat this step on node C.
  6. To get the remote port information, execute the following command from the $CRS_HOME/opmn/conf directory: ./ons.config
  7. On node B, execute the following from $CRS_HOME/bin:
    ./racgons add_config node B:Remote_Port node C:Remote_Port
  8. Execute the following command to get the interconnect information. You can use this information in the next step.
    $CRS_HOME/bin/oifcfg iflist –p
  9. Execute oifcfg command as follows:
    oifcfg setif -global interface_name/subnet:public inteface_
    name/subnet:cluster_interconnect

Important Considerations when Cloning Oracle Clusterware

Should have an existing home on the remote node and it should be writable.
Should have executed root.sh and should have run other configuration tools on the source node.
Can also use a response file instead of passing these parameters through the command line.
The tar operation need not be performed as root.
For a shared home need to also pass -cfs parameter on the command line.
Never pass the CLUSTER_NODES and LOCAL_NODE parameters through the command line.

Cloning Real Application Clusters

  1. Archive the Real Application Clusters home from node A (existing) and copy it to node B and node C. (new nodes) ($ORACLE_HOME)
  2. Unarchive the home on the nodes B and C. In case of shared home, unarchive the home only once on either of the nodes.
  3. On nodes B and C go to $CRS_HOME/oui/bin and execute the following command:
    perl clone.pl ORACLE_HOME=Path to the Oracle_Home being cloned ORACLE_HOME_NAME=Oracle_Home_Name for the Oracle_Home being cloned '-O"CLUSTER_NODES={node B,node C}"' '-OLOCAL_NODE=node_B"
  4. For UNIX, perform the following additional steps: On node B, go to $ORACLE_HOME and run root.sh. Repeat this step on node C.On node B, set the environment variable to ORACLE_HOME. Also add $ORACLE_HOME/lib to LD_LIBRARY_PATH.
  5. Run Net Configuration Assistant on node B.
  6. Run Database Configuration Assistant on node B.

Important Considerations when Cloning Real Application Clusters
The order of nodes specified should always be the same on all hosts.
Oracle Clusterware should be installed on the cluster nodes prior to starting Real Application Clusters installation.
The nodes for Real Application Clusters installation would be a subset of the nodes for Oracle Clusterware installation.
For a shared home you need to also pass -cfs parameter on the command line.